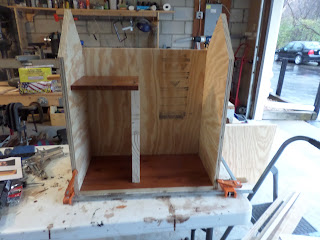
I'm outside right now and I'm doing a dry assembly of the box portion of the little library and so far it's going well. Here's some photos:
Dry Assembly
The first thing I did was begin assembling the interior shelves. There are three shelves but one of them, a horizontal shelf on the right has to be cut to fit so I haven't attached that shelf yet. The whole thing is resting on the floor while the glue dries.
Voila!! Here it is held together with bar clamps. The parts all fit except the back which you'll see the problem in the last photo:
Here's a side view:
Here's why you should dry fit parts before assembly-the rear panel is a little too long and would keep the rear roof panel from fitting snugly. If I trim off about 3/4" or so that should correct the problem.
I'm going to take the clamps off now and trim that rear panel and then I'll begin gluing and screwing it together.
Assembly with glue and screws - this is a two person job
Working with construction glue
Wow, that stuff is an adventure in and of itself to use. It is very very thick like chewing gum and it sets up fairly quickly so you need to have everything you'll need within reach before you begin.
I want a very strong library with very strong joints. I also wanted a thick glue that would help seal the joints and any little cracks where moisture could enter and I must say Liquid Nails really fills the bill with that (I'm going to send those people a nice note. Did you know that you can build a retaining wall with construction glue? I didn't know that). I also used Kreg Jig self tapping screws. I drilled a small diameter pilot hole for each screw to help guide the screw in properly and to minimize any vibration while I was drilling.
Framework for the post and bottom panel
Before I began assembling the box I added two 2x4s to the underside of the bottom panel:
The post will fit between the 2x4s:
Gluing the sides and back panels
Here's a photo of that glue. I placed a very thick bead of it on all the glued edges to fill up the joint.
Here is one of the side panels attached to the bottom. You can see how the glue has squeezed out and I'm leaving it there to dry:
Here is the rear of the back panel. We scraped off some of the excess glue:
And this is what it looks like right now with two of the interior shelves just sitting in place. One of the roof panels is glued and screwed in place as well:
Tomorrow is a busy day-
I need to install the interior shelves,
Finish the inside of the box,
Attach the other roof panel,
And get the roofing materials from my neighbor to shingle the roof.
On Tuesday I'll-
Make the face frame for the front of the box,
And make the door.
Wednesday-
I'll finish the exterior and fix any remaining problems,
Apply deck finish to the pole and let it dry,
Thursday-
Apply more finish to the exterior to make it really waterproof and let it dry.
And then it's time to dig the hole for the pole and set it in place. Maybe we'll have a grand ceremony.
Well, it's been raining and snowing here today and I'm just about frozen through and through. I'm going to sit down and have some very hot tea and defrost.
See you tomorrow,
VW


No comments:
Post a Comment