Sunday, March 27, 2016

The Cradle Project-cradle assembly

Hi Everyone,

Well, today was the first day that I have been well enough to assemble the baby cradle. After my last blog posting I got really, really sick and basically life stopped for about 10 days while I recuperated. But I am better and so I decided to continue working on the cradle and get it finished. It's about 28 days until the baby's due date so here we go:

The cradle consists of two structures: the cradle box and the rockers.

Here's the cradle box:

My husband Jim the engineer and my youngest son Critter gave me a hand today with the assembly. The first thing that needed to be done was to bevel the bottom edges of the side panels and that took quite a bit of work as I have a very small table top table saw and the boards are rather long and awkward. We did manage however to figure out the correct bevel angle and set up. This is Jim about to saw the boards:


Here is another photo of the edge running through the saw:


Cutting the side panels was successful. The next step was to drill the screw holes for the wood screws:

Here you can see that all the screw holes were countersunk to accept a wooden plug and you'll see a photo of that in a minute or two:


This is Critter giving me a hand. It's really cold outside and my hands just got very cold and stiff so the help was appreciated:


Here's Jim and Critter, the human wood clamps, helping to line up one of the end panels for drilling and screwing:


And here is a photo of one of the end panels. Everything went together very well:


Here it is screwed together. Not bad:


With that done, the next step was to cut the bottom panel and screw it onto the sides. This is Jim measuring:


 Here's a photograph of the bottom of the cradle. It's made out of three laminated 7 1/2" pine boards:


Ha! Critter decided to warm up some leftover pizza. Looks like it got nuked instead!


Trimming the bottom panel down only took a couple of minutes. Here it is just sitting in place:

And here it is drilled and ready to be screwed in place:


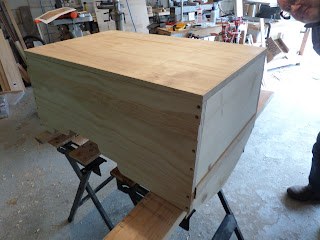
And here is the box portion of the cradle, completely screwed together:

And here are those countersunk screw holes I told you about:


The Rockers

This part was very straight forward. It's just the rockers screwed onto a center 2x4. This entire thing will be screwed to the underside of the box. And yes, the rockers actually rock back and forth:


And here it is assembled and undergoing an inspection:


A very complete inspection:


Ok, now the cradle needs to be sanded and all the sharp edges eased with sand paper and then the final finish put on. The last thing will be to bolt down two wrought iron handles on the end panels so the cradle can be easy picked up and moved and I'll get to all this this week.

Stay tuned for the completion photos. We're almost there. And so is my grandson!

VW

Wednesday, March 16, 2016

The Cradle Project, continued-odds and ends

Hi Everyone,

I have a bad cold at the moment so I'm not going to do very work on the cradle today. But I do have a little bit of work to alter the design of the cradle and that is to add some wooden accent pieces to the sides and ends and to also prepare the ends for some handles.

Here's today's photos:

I'm going to add some pine moulding to the sides and ends of the cradle. The "box" part of the cradle looks, well, a little boxy and I'd like to break up that appearance a little and the moulding is a simple and easy way to accomplish that. This is a photo of one of the ends with a strip of pine lath placed across it:

And this is a photo of one of the sides also with a strip of lath along the length of the panel:


This is a photo of the handles. They are made out of wrought iron, they're heavy, and they should last a very long time. These enable the cradle to be easily picked up and moved and they too add some visual interest to the overall appearance:


This is what the handles will look like on the ends of the cradle:


I was going to make the bed portion of the cradle today but I don't have any lumbar wide enough for this so that will have to wait until tomorrow. Today I'm just going to glue the lath to all the panels, let everything dry, and tomorrow carry on. I'd like to assemble the cradle on Friday and I'll do so unless my cold gets worse.

So soon as I'm done it's off to bed and lots of tea and honey.

See you all on Friday,
VW

Monday, March 14, 2016

The Baby Cradle Project, continued: Finishing the parts for the cradle

Hi Everyone,

I only did a little work on the cradle today. I've finished most of the parts and I've sanded all of them smooth. Here's today's photos:

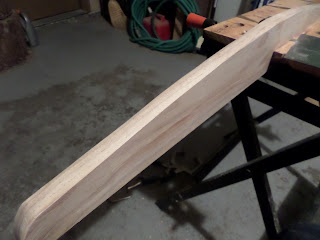
In my last blog posting I talked about making the rockers for the cradle and today I finished them. I'm in the middle of a head cold at the moment so I decided to just get out some hand tools and do the rocker finishing with those. I used a draw knife to remove the saw marks and a file to smooth everything down. There's something so satisfying about making wood shavings by hand. You can really control how much wood is being removed and I find myself much more engaged with the process than I am when I'm using power tools.

I also elected to leave some of the tooling marks from the file and the saw-I want my grandson and future generations to know that the cradle was constructed by a single individual and not in a factory. I hope this tells him that his grandmother really loved him a lot and was looking forward to the day when he was born:


And you can see that the rocker is nice and smooth:

 Here are all the of the pieces of the cradle (l to r): a crossbeam which is going to connect the rockers to each other and also connect them to the underside of the cradle. I'll talk more about that when I assemble the cradle in a day or two, and the end panels. These will have wrought iron handles fixed to them so the cradle can easily be picked up. I'm waiting for those to arrive:


More pieces (top of photo to the bottom): the side panels, the rockers, and the wooden "wings" which will be glued to the edges of the side panels (see below):


This is a photo of one set of wings being glued to the edge of one of the side panels. Each panel will have one long set of wings and one short set of wings:


The only thing I have left to make is the bed of the cradle and I'll do that later on this evening. You'll see that when I assemble the cradle in a day or two.

Well,  my head feels like it's filled with concrete so I'm going to stop and get some rest today...just like this guy in the photograph:


What's left to do: make the bed of the cradle, make the rocker assembly, attach the handles when they arrive, and then assemble the cradle. After that I'll apply the finish and the cradle will be finished.

See you tomorrow,
VW

Wednesday, March 9, 2016

The Baby Cradle project, continued: Rocking the Cradle

Hi Everyone,

After the major triumph of several days ago, I began to give some thought to the cradle rails and just how these will be attached to the cradle box.

I've been searching on the Internet for guidance on drawing a large arc and for how to determine the degree of arc for the rails. The only thing I could find was a blog about rocking chair rockers which doesn't quite work for a baby cradle (the link to the site is: Rocking Chair University. This is a really worthwhile site so keep it for future reference). So after a day of thinking about this, I decided to go down to the workshop and fiddle around for a bit. Here's the photos:

Drawing an Arc

Drawing an arc on a piece of wood is really simple. I think I found this method on Lumber Jocks, a favorite hangout of mine and it's really simple-as I was reading the posting there I had one of those "why the hell didn't I think of that" moments:

I got an old 2x4 and clamped it down on a saw horse:


And marked off a 24" wide section of it and also marked off the center line at 12" :

I nailed 2 nails into the 2x4-one at each end, 1" down from the top edge of the board and another at the bottom end of the mid line. Then I took a flexible metal strap and placed the outer edges of the strap above the nails and the middle of the strap below the nail at the mid point:


And I drew an arc:

And just for the heck of it, I drew a wider arc just below it using the same method and marked off:


And here is where I am at the moment. For the moment I prefer the wider of the two arcs so the cradle will have less of a rocking motion side to side:

Next, I need to figure out the framework for the bed and the attachment framing for the rockers.
Stay tuned,
VW

Monday, March 7, 2016

The Cradle Project, continued: Redesigning, courage, and having enough clamps

Hello Everyone,

Well I'm back. I've fretted over this project for the past week and I almost talked myself out of completing it as I didn't think I could bring it to conclusion.

It's easy to get yourself into a rut and make the same kinds of wooden objects time after time. You become expert at it but you never progress into other areas of woodworking and by doing that, you never grow as a craftsman. A clear eyed assessment of your abilities and tools are one thing but just scaring the hell out of yourself and not trying something new is something else and I almost fell into that trap. But carefully re-thinking and re-drawing the plans and just deciding to have a little faith in myself and my abilities to get from one step to another got me through this.  This is one project that will be finished.

Here's where I am as of today:

I discarded the end pieces that I ruined last week, purchased two laminated pine panels and cut out new end pieces which were to be left in one piece with no cut outs.

I re-drew the plans and marked off the boards in pencil. You can see Rhubarb the Cat helping out and consulting on the project:


 The tops of the end pieces are rounded and so I had to draw a large arc to accomplish that and so I used a pencil and string for that. Not the best way of doing this. I'm going to have to find a better way of doing this. The string in the photo is a shoelace that Rhubarb and Biscuit, our other cat, enjoy playing with and they were gracious enough to lend it to me:


Now as you can see the base of the panels are narrower than the top. This will give the cradle a more open appearance and keep it from looking too box-like.

Cutting these was a two man job so I got my husband to help me out with the cutting and this step went well:

After that end panels were completed, it was time to turn my attention to the side panels and for that I decided to re-use the laminated panels from the previous design. These panels will need to be narrower so I carefully removed the screws from the wood and re-sawed it on the table saw:


After the table saw I cut off 5 inches from the ends to shorten the boards to 33 inches long. Note all the clamps, my extra set  of hands:


And here is where the project is at the moment:


My husband is holding everything together. Also not the wings on the upper edge of the side panels:


Having seen this last photo was a huge relief-the parts will fit together and there will be a cradle. 

Ok, the next steps are to sand the panels well and then edge glue the wings onto the side panels. Then I'll need to design the bed of the cradle and the rails so there's more work to come.

See you all soon,

VW

Wednesday, March 2, 2016

The Baby Cradle project-re-designed

Hi Everyone,
Well, I'm back. After last week's debacle, I spent the rest of the afternoon that day sulking and that evening I got out my pencils and drawing stuff and re-designed the cradle.

I wanted to be able to use the wood that I had and I think I've come up with a design that does that. The cradle will still have the same dimensions but it won't have rails for rocking. Instead it will have straight rails to move it off the floor. And it will still be made out of pine.

Here's some photographs:

I'm going to use the long sides and I'm going to add a little decoration to them by adding some "wings" to the upper edge. I've made some out of pine to match and this is what they look like:


This is what the long sides will long like after I've glued everything together:


While those are gluing I'm going to reconstruct the ends out of pine and I'll talk about that in my next posting.

VW