Tuesday, September 29, 2020

Calico Bowl continued-the scraper worked!

 Hi Everyone,

Well I tried out the scraper and it worked! Saved me a lot of time trying to smooth out the roughness inside of the bowl.

Here's a couple of photos to look at:

These two photos show the bowl on the lathe-


And here are a couple that show the bowl outside in the sun:


Now I'm going to spend the next several days sanding and I'm hoping by Thursday I'll be able to begin applying the varnish to the surface.

Stay tuned,
VW

Saturday, September 26, 2020

The Calico Bowl continued-the scraper has arrived

 Hi All,

Well the scraper for the Hollow Master arrived this afternoon. I use scrapers a lot to smooth and help finish the insides, and outsides, of bowls and boxes. Here's a couple of photos:

In this photo you can see the swan-neck tool that Robert Sorby makes. This was developed to hollow out deep turnings like vases and since the cutter at the tip is removable a scraper tip can be installed to help smooth the surfaces of bowls, etc:


 In this photo you can see the ridges that occur when hollowing out bowls and since most cutting tools have their cutting edges at the very tip of the tool shaft, that makes cutting and smoothing a deep bowl like this very difficult:


This round cutter can cut on all the sides of the cutter so getting to the sides of the bowl is a lot easier to do:


And here you can see the cutter installed on the tip of the shaft of the tool:

Tomorrow afternoon I'm going to take the bowl back down to the lathe and work on smoothing the inside of the bowl and also the outside. When that's done it will be time to put the finish on and mail this bowl to it's new owner.

And I'd like to give a big shout out to Craft Supplies USA in Provo, Utah for getting this scraper to me so quickly. Thanks!!!

Ok, see you all tomorrow,
VW

Friday, September 25, 2020

Pine Coffee Table, continued: working on the top and bowl update

 Oh Hello All,

I am really beat today. We finally finished a 6 month total clean out of our place. We've gotten rid of old furniture, a car, old clothing, books, and assorted other stuff. I feel like I've lost 100 pounds!

I spent more time on the coffee table today, re-working the design, the colors, and other stuff. Here's today's photos:

The first thing I did was ditch the wooden frame and substituted a pipe frame. As I had the pipe and the pain in stock, this didn't cost me anything upfront. I cleaned the pipe, scrubbed it well with soap and water and then dried it in my kitchen oven. After it cooled off I sprayed a primer on it and let it dry over night. Then this morning I painted it a bright green and here's what it looks like right now:


The next thing I did was remove the bread board ends and rip them in half length-wise and attached those to each end to give the top a more finished look. I attached them with screws and covered the screw heads with oak dowels:


And now I'm in sanding mode:


I'm going to sand it some more tomorrow and then apply several coats of wood sealer. This wood is soft and it will absorb the wood stain like a sponge and leave a splotchy look to it. After that I'll be applying a coat of Minwax pilgrim pine stain and when that dries, a layer of gunstock stain.  Stay tune for all of that.
________________

The Salad Bowl

Well, the bowl has been sitting on my dining room table and the more I look at it the more I love it. I am currently waiting for a round cutting head for the Robert Sorby-Hollow Master tool I have. I want to be able to give the interior of the bowl an absolutely fine finish. So stay tuned for that.

Ok, I'm off to sit down and rest a bit. I wish I didn't have to make dinner!

VW

Thursday, September 24, 2020

The Pine Coffee Table, continued-oh no...

 Hi All,

Well, I don't usually mess up things but this time is one of those times where something went wrong. Here's today's photos:

Here it is dry fitted and in place in my living room and it's huge! I specifically down-sized it so it would fit in my small living room. And I couldn't make up my mind between the wooden framework or making a frame out of pipe.
Well, you can see how large it is-hell, you could land an airplane on the top! And it's way too tall for a coffee table. So the table is going downstairs for a re-work and a plumbing pipe frame underneath. We used to have a plumbing pipe coffee table and when I disassembled it a few years back, I kept the pipes. And eliminating the wood frame gets rid of the orange stain. A win-win for everyone.


So, I'm going to take off the ends of the top, and take the wood frame downstairs and disassemble it and re-work the entire thing to be an industrial style table with pipe. 

Stay tuned,
VW

Wednesday, September 23, 2020

The Pine Coffee Table, continued-working on the top

 Hi Everyone,

Well, I've partially assembled the top and I'm reconsidering the framework for the table. Here's a couple of photos from today:

Here's the first photo-the center section has been assembled with Kreg jig screws and a bit of glue and it looks fine on it's own. If it were just a little bit longer it would be perfect. So I set the bread board ends on either end and looked at it and I'm not sure I really like the way it looks. And it's a little too long for my small living room:


So I removed the end pieces and just stuck a scrap piece of 2x4 on one of the ends instead and I think I like it better:


I'll think about it over night but I'll probably wind up using 2x4s instead of the bread board ends. I'll have to re-work the framework but it's still in pieces so that won't be difficult.

So then I was looking at the pieces of the framework-I gave the pieces a coat of Minwax stain in honey and now I have orange brown pieces of wood which I'm not too crazy about. So, should I paint the parts and use them or used plumbing pipe, which I have a supply of? More overnight thinking.

Stay tuned,
VW


Saturday, September 19, 2020

The Calico Bowl, continued-bowl depth reached, and Coffee Table Update

 Hi All,

Well, I've taken the bowl off the lathe. The bowl is very close to 4" deep and to avoid cutting into the slot for the vice underneath (I did that once-what a disaster that was) I'm going to stop hollowing now and not press my luck.

The bowl still needs a fair amount of work but the bulk of the hard work is past. Here's today's photos:

In this first photo you can see a lot of deep scratching on the inside wall. That will have to be removed by turning:


Here's a photo of the outside of the bowl. I love the colors and mix of wood. I'm quite pleased with this:

The side that has a big thick piece of white oak:


And that's the bottom:

The bowl is sitting on my dining room table right now. It's heavy and given it's size and composition quite striking in appearance. I think this will make a great center piece for a party.

______

Coffee table update

I have the parts for the top cut and I'm still staining the parts for the frame work. The orange color is horrifying and the whole thing will need more staining, possibly with a deeper color of brown.

Here's some photos:


The photo doesn't do it justice-it's bright orange (sigh):


The top is going to be a bread board style construction. The boards for the center of the top are about 34 inches long. I was going to leave the printing on the boards on for an industrial look-I took a poll of friends about this and most voted not to do this so I'll flip them over:


Here's what the ends of the top will look like. I've removed the corners-I can just imagine myself walking into the corners all the time, getting sick and tired of that, and placing the table outside with a free sign on it so off came the corners:


I'm going to go and do some more staining on the frame. Stay tuned.

VW

Wednesday, September 16, 2020

The Pine Table Coffee Table project, continued

 Hi Everyone,

Well, it's been a busy day but I got a lot done. Here's today's photos:

I've got all the lumber for the framework cut up and I must say I'm very pleased with the way the parts came out. The next thing I did was sand everything with 150 grit sandpaper:


I dry fitted the parts together to make sure everything fits together:

Next I drilled the holes for the Kreg screws:


After that I removed all the wood dust and gave each part a coat of Minwax wood conditioner and then I popped open a fresh can of Minwax wood stain in gunstock. On yellow and light colored woods it looks really really orange. 


Now this is not the final color. When this dries completely I'll stain it again with several coats of Minwax wood stain in pilgrim pine. This will produced a medium reddish brown which is different and the color of the side table I made last month and that I really like.

So that gets to dry overnight and I'll work on it more tomorrow.

Update on the bowl: It's hollowed down to 3 1/2" and I'm in the process of smoothing the inside wall of the bowl, refining the rim, and flattening the inside bottom. So stay tuned for that.

More tomorrow,
VW

Monday, September 14, 2020

The Pine Coffee Table project

 Hi Everyone,

Whew! It's been a long day today and I'm sitting down with my feet up. In addition to the salad bowl project in the previous posting, I'm beginning another project and that is, building a small, simple coffee table for my living room.

I have a small living room and I need an equally small coffee table that isn't expensive to build and that can be moved down to the family room if needed there. I'm going to be modifying a set of plans for a dining room bench that I found on the Shanty2Chic website. I'm going to shorten the length and widen the width and that should produce a small coffee table. I'll be referencing these plans as we go.

I will begin the project by dividing it into two parts-the top, which will be a bread board type design and the framework which is composed of the legs, the cross braces, and the stretchers. I purchased 4-2"x4"x8s" and
2-2"x6"x8"s of kiln dried pine. 

The Frame

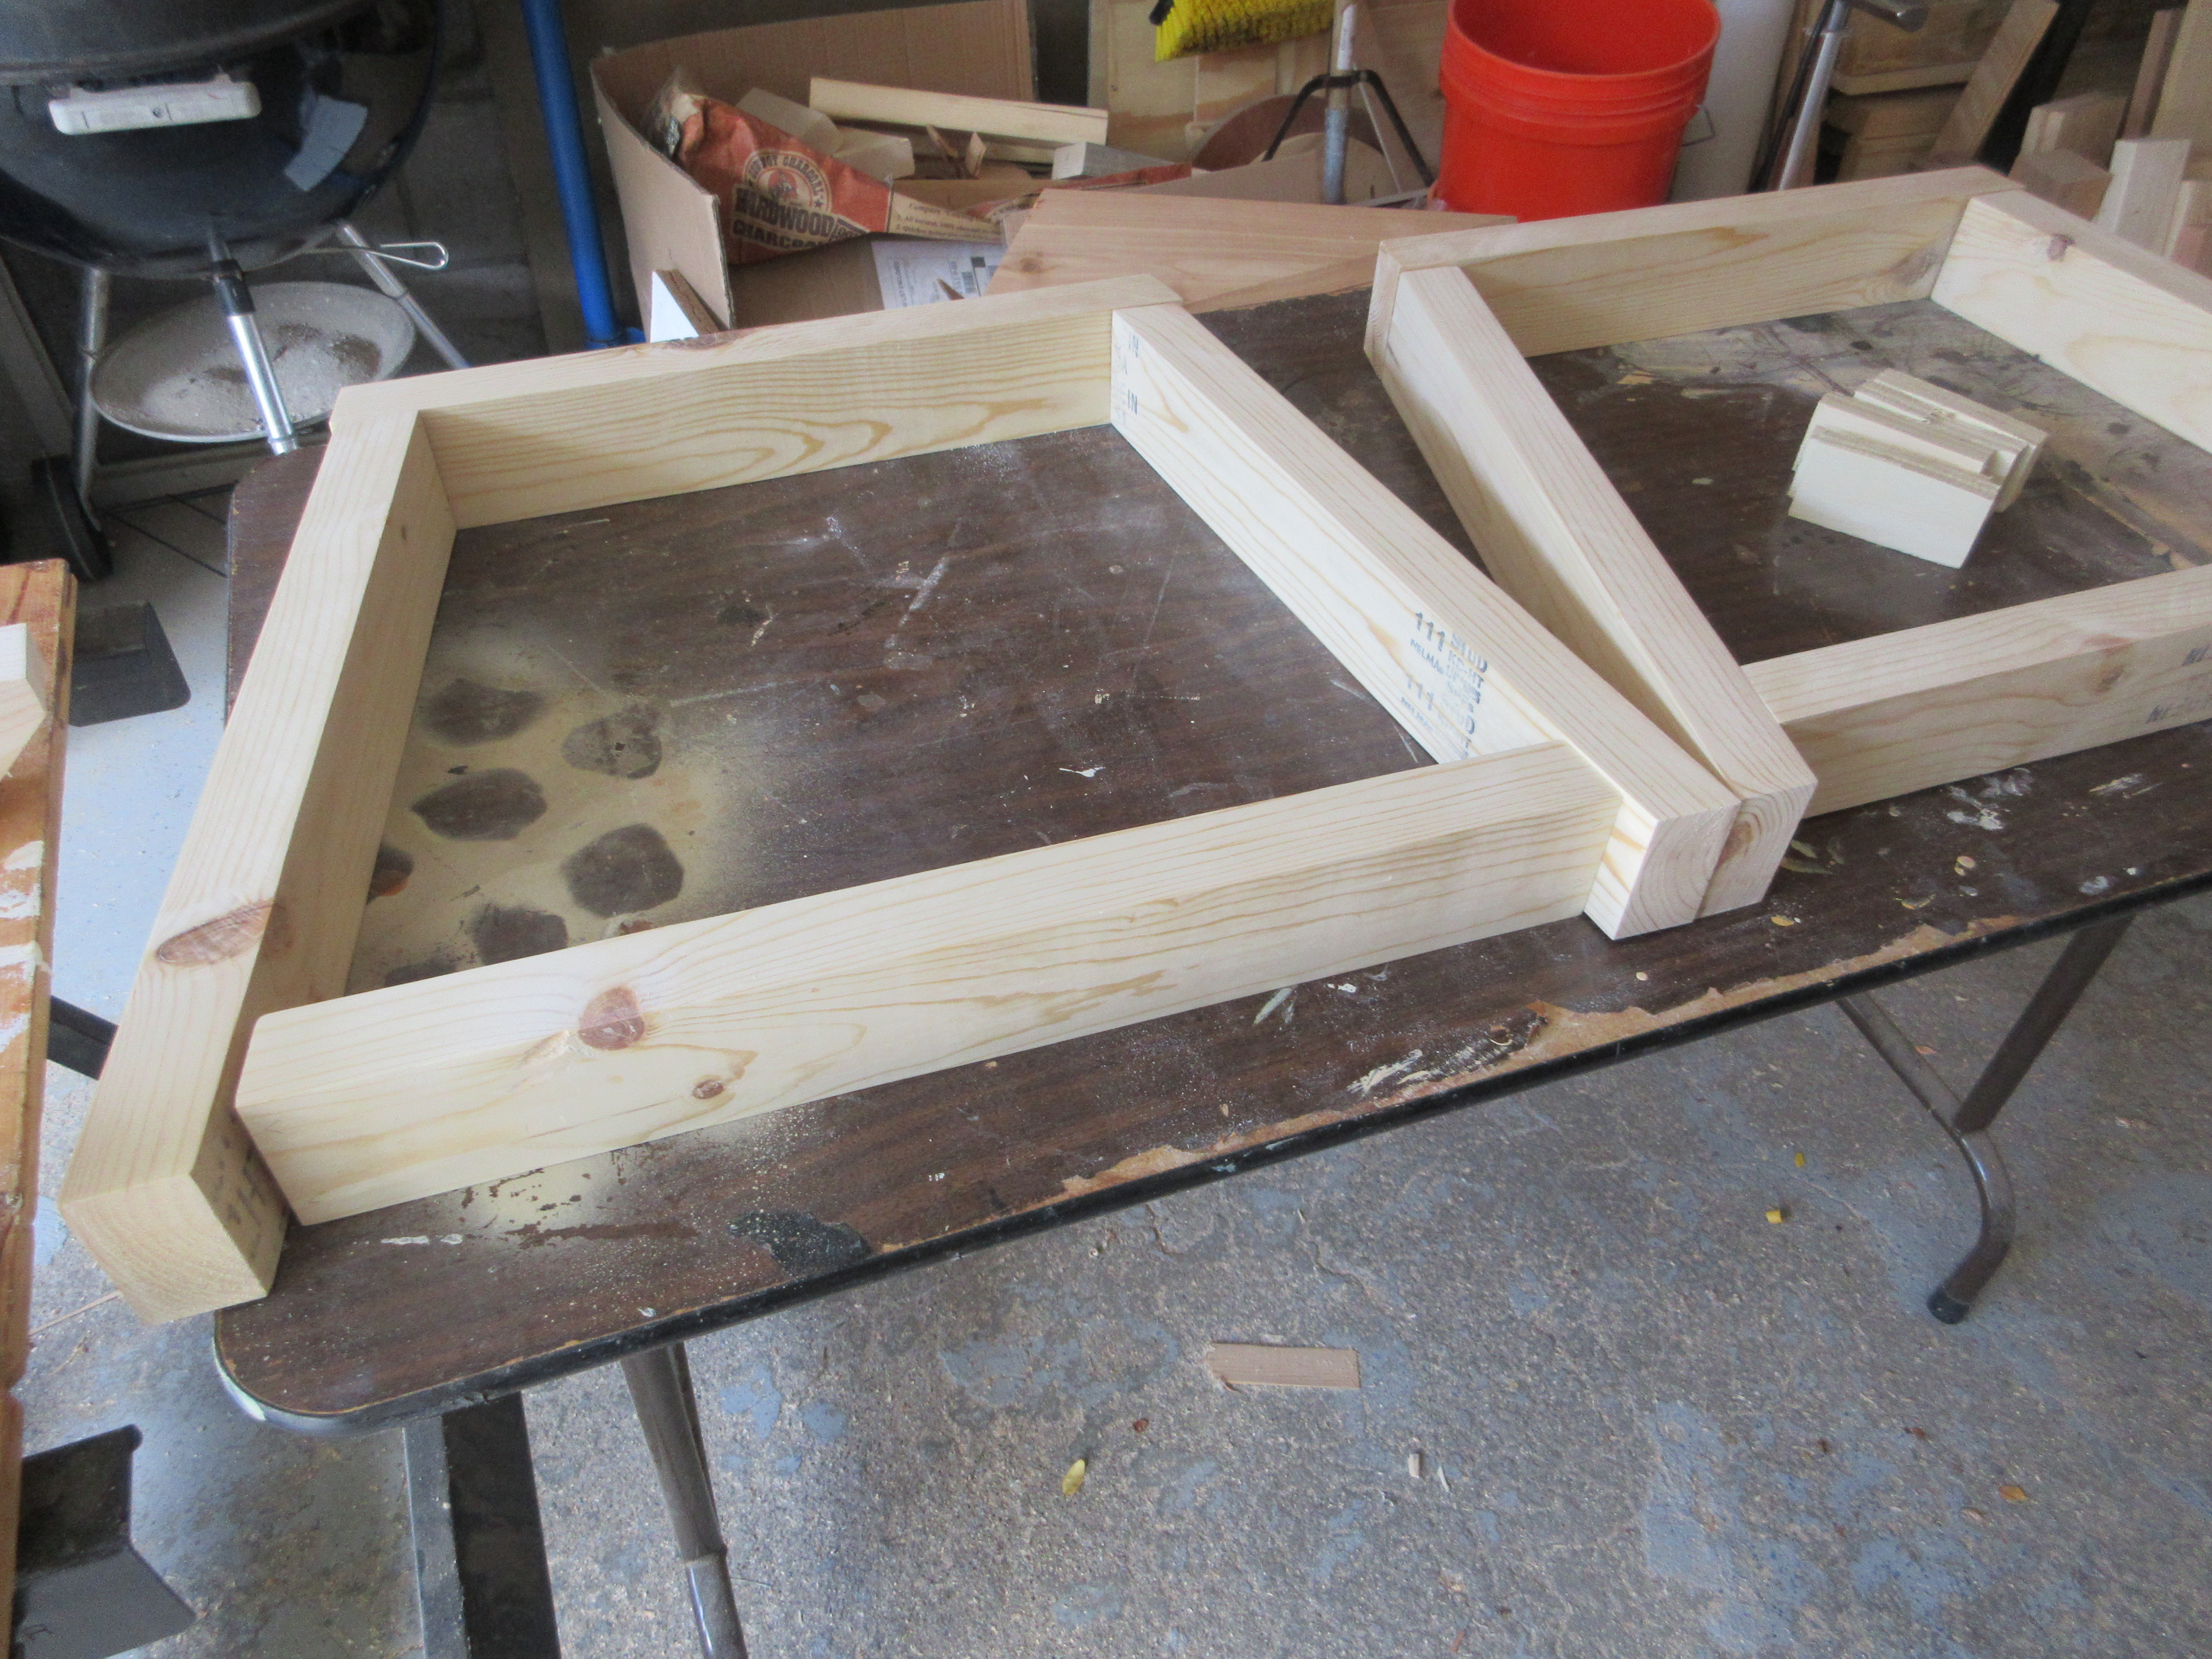
I began by cutting out the following parts from the 2x4s:

4 legs, 18" long,
2 cross braces 18" long,
2 cross braces 20" long,
2 stretchers 45" long.


Next I ran all of those parts through the table saw and ripped off 1/4" off the sides to square the sides and get ride of the rounded milled edges. It makes the resulting pieces look a little less like a 2x4.


And then I just dry fitted the pieces together just to see if everything has a chance of fitting together and I think they will:


And at that point I fizzed out.

Ok, the next step involves sanding everything and getting the pieces ready for staining.

See you soon,
VW

The Calico Bowl, continued-hollowing continued

Hi Everyone,
Here's an update on the bowl-I'm still hollowing it out after several days off last week. I'm going slowly on this turn so the remaining wood has the time to adjust to a different shape. Here's a photo from this morning-the bowl is a little over 3" deep at this point:


Originally I was going to make the bowl 4" deep and I'm going to hold to that. My plan going forward is to remove another 1/2" of wood and then use the remaining wood to flatten and smooth the bottom and the sides. 

Now winter is on its way and my shop isn't heated. I probably have about 2-21/2 months of shop time left so I'm going to begin a secondary project and build a much needed coffee table for my living room. I'm going to modify some bench plans from Shanty2Chic to make a small, simple coffee table and I'll post about that in separate posts.

So stay tuned-there's still lots of stuff happening in the wood shop!

See you later this week,
VW

Sunday, September 6, 2020

The Calico Bowl project-Hollowing out the bowl

 Hello All,

For those of you in the US, I hope you're all having a good Labor Day weekend. For everyone else, I hope you're having a good day.

Well, the bottom of the bowl is finished so it's time to flip it over and create the rim and begin hollowing it out. Before I did that though there were two important questions to be asked and answered, namely how deep should the bowl be and how thick should the wall be?

The entire blank was 5 inches thick, with a 1/2 slot on the bottom to accommodate the Nova chuck. So I'm going to go with a depth of approx. 4 inches. And since the sides of the bowl are concave, I'm going to turn the wall to a thickness of 3/4". 

Ok, with that decided, here are today's photos:

Here's the top of the blank. I mounted a faceplate on it and when I was removing the screws, sigh, I broke two of the screws. In the lower photo you can see the top of one of them:


In this photo you can see that I've turned away the surface and marked off a 1" boarder. This will give me enough wood to turn the rim and refine it bit by bit:


Here you can see the blank with nearly 1" of wood removed and the rim roughed out:


And here is the rim from the side. It will need more work as this the process plays out:


Tomorrow I'll have to go and get a plug cutter to remove the screws and then I'll be able to proceed with the turn.

See you soon,
VW

Thursday, September 3, 2020

Calico Bowl project-finishing the bottom

 Hello All,

Well I was back in the wood shop today and I finished the bottom of the bowl and I've probably finished turning the sides as well. Here's today's photos:

Here is the bowl before I began working on it. The sides are rather straight and so they need to be made more concave both along the side and underneath the top edge. So back on the lathe it went:


Here is the bowl after about 30 minutes of turning. The sides have a more pronounced concave curve to them:


I decided at this point to take the bowl off the lathe and look at it while it was just sitting on the foot of the bowl. It lays perfectly flat and it doesn't spin. Time to put it back on the lathe and sand the bottom of the bowl:


Tomorrow I'll finish sanding the bottom and then put a coat of polyurethane on the bottom of the bowl.

See you all tomorrow.

VW