Friday, June 26, 2020

Pet Urn-Compeletion Photos

Hi Everyone,

I'm sorry I didn't post these photos sooner-I've injured one of my knees and I've been hobbling around trying to get through the list of things I need to do.

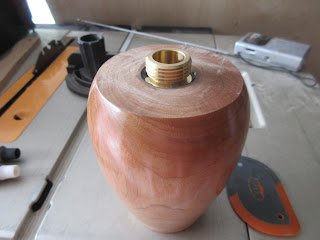
Ok, here is the finished urn out of maple and cypress woods:


Here is the underside of the lid-you can see the brass cap screwed in place and a rubber gasket. The brass cap screws down to the base and the gasket prevents the contents from coming out:


Should it not be possible to unscrew the lid at some future point, I've left a dimple on the bottom of the lathe that marks where a drill hold could be placed and the contents shaken out:


So we'll call the project done.

________________________________________

News: I have a new lathe coming and it should be here in mid-July. In the mean time I'm going to work on some furniture projects that have been on my to - do list for a while: a coffee cup cabinet, a living room chair, and a coffee table so stay tuned.

Thanks for dropping by and watching the project build. There's always something going on here at the shop so grab some coffee and put your feet up. 

See you soon,
VW

Saturday, June 20, 2020

Pet Urn, assembled and completed

Hi Everyone,

Well the urn is finished. I've epoxied the brass part into the body and lid of the urn and the epoxy is setting. Here's today's photos:

Ok, here are the parts of the urn: wooden top and bottom and the brass hose fittings to be epoxied into the top and bottom of the urn:


I use JB Weld Epoxy for all sorts of stuff. I've never had it fail and I think on their website there's a story about someone using it to repair an engine block in a farm tractor in Texas. Wow!
JB Weld


Here's a photo of the underside of the lid with the brass cap epoxied in place:


This is the hose portion that is going to be epoxied into the bottom in a minute:


And here is the fitting epoxied in place:


And with that the urn is complete.
I'm going to let this harden over night. On Monday I'll get completion photos for you before I mail it off.

As tomorrow is Father's Day here in the US and my birthday, I'm taking the day off!!

See you Monday,
VW


Thursday, June 18, 2020

Pet Urn continued-closing the bottom of the urn

Hi Everyone,

I've enclosed the urn with a small piece of hard maple. Here it is on the lathe ready to be turned:


And here it is almost finished. I plan to lightly sand both the bottom and body of the urn again and then apply a coat of polyurethane to both:


Here it is, upside down inside my home and attached to the Nova chuck. Once it's dry and that shouldn't take too long as it's hot here today, I'll put it back on the lathe and apply another coat of poly:


In a day or two when the finish is fully applied to the body and the lid, I'll epoxy the brass fitting in place and then it will be finished.

Stay tuned,
VW

Monday, June 15, 2020


Pet Urn, continued-sanding and adding the finish

Hi All,

I've finished turning the top and the body of the urn so I sanded everything very smooth and put a first coat of clear polyurethane on both parts. Here are the photos:


Here's the top:


...and here's the bottom. I still need to make the bottom for the urn and I'll do that tomorrow after everything has dried:


Stay tuned,
VW

Friday, June 12, 2020

Pet Urn continues-working on the lid

Hello All,

I'm having some problems with posting photos here today-not sure why. But I did manage to turn a lid for the urn. I had a block of mahogany I was saving for something special but I can't for the life of me find it so I went with a similarily sized block of cypress, which is not the best turning wood. It's too soft for the slow speeds my lathe is only capable of right now. It tore and crumbled and was in general a bit of a headache to turn. I did get it turned however. It needs more shaping but I think it might work.
If I can refine the lines of the lid I will.
If I can figure out how to post photographs later, I will so you can see it.
Stay tuned,
VW


Thursday, June 11, 2020

Pet Urn continued-drilling the top part of the urn

Hi Everyone,

In my last post I briefly mentioned using a brass hose fitting to create an opening in the top of the lid so the urn can be re-opened at a later date and that's what I did today. Here's today's photos:


I took the urn off the lathe so I could flip it over and begin drilling the top. In this photo the body of the urn in 5 inches high:


This is the top. The depth of the interior is 3 inches so that gave me 2 inches of solid wood to work with:

This is the hose fitting I'm going to use. It's about 1 3/4" high with the top on:


And the flange is about 1 1/4' in diameter:


This is part of the fitting that will be inserted and epoxied into the base:


Here's the urn after it's been drilled. I drilled a hole 1 1/4 inches wide by about 7/8 inche deep:


 This is the same thing only with the urn off the lathe and the fitting just sitting inside of the hole. Next I finishing drilling a smaller hole, 3/4" in diameter to create an opening into the interior:


 And this is what it looks like now. I'll place a bead of epoxy underneath the flange and sit the fitting into place:

This is what it will look like without the top:

Now the next thing I need to do is make a lid that the cap in the photo will fit into. That way the top can be screwed on and off easily. I have some mahogany in the shop and I also have a thick piece of goncalo alves wood too that turns very nicely. Either one would make a lovely top and bottom pieces so that is the next thing that I'll do.

Stay tuned,
VW


Monday, June 8, 2020

Pet urn continued-hollowing out the urn


Hi Again,

I began hollowing out the urn with turning chisels and that didn't work out against the end grain of the urn so I switched to Forstner bits. I began with a 2" diameter bit but that was way too big to cut through the wood without heating it up and probably cracking it. And then the lathe stopped working. So I decided to let everything cool down and start again.

So I removed the wide bit and began with a 3/4" wide bit and that worked handily and I worked up the diameter of the bits a 1/8" at a time and got it hollowed out without a problem. 

Here's the photos:
Here you can see inside of the urn and the various levels I'd had turned to:


And here it is hollowed all the way out. It's 3" deep x 2 1/8" wide. I haven't figured out the volumne yet:


Now I realize that I'm lucky I have a set of Forstner bits on hand because if I didn't I'm not sure how I would have hollowed this out. Moral of the story: think about hollowing before anything else!

Next step: I'm going to take the urn off of the lathe, flip it over and re-attach it and begin working on the top and urn closure using a brass garden hose fitting in the photo below:

Stay tuned,
VW

Sunday, June 7, 2020

Pet Urn, continued-dealing with cracking

Hello All,

I did all this yesterday but forgot to post it-here's an update:

I decided to narrow down the mid and top portion of the urn a little bit both for aesthetic reasons and to see if I could minimize or eliminate the cracks near the top of the urn. This is a photo of how it looked before hand:


And here it is afterwards. I decided to sand the surface while I was at it and got a very nice result. It's very smooth to the touch...


...but the cracks are still there. They are shallower but still visible:


So I decided to fill them with glue and wood dust to minimize their appearance:


And I stopped there to let it dry over night.

While it was doing that, it was time to begin thinking about how to hollow this out and I decided, given my arthritic hands, to use a large diameter Forstner bit drill out the inside. I've done this before and it can do a nice job of hollowing. The downside is that the bit and the surrounding wood will get very hot and this can cause cracking in the wood. So I'll do that a little bit at a time.

The other major step is to begin thinking about how to make the urn so it can be opened at a later date. For that I went to a big box store and got a brass fitting to deal with that and I'll talk about that in my next posting.

Stay tuned,
VW

Friday, June 5, 2020

Pet urn, continued

Hello Again,

I took a break (actually took a nap-it's hot and I'm tired) and then went back down to the wood shop to work. I've got the block back on the lathe and I've got it roughed into shape. But there still is a problem-see the photos below:

Photos
Here's the turning block. I trimmed off the irregular wood on the ends and now they are parallel and it's ready to be placed on the Nova chuck and the exterior shaped:


Here it is between centers and ready to go:

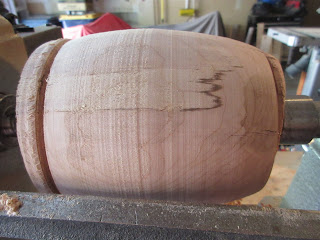
 Here is the block in motion. The wood is hard maple and maple tends to have a pink undertone to the wood and you can see that clearly in the photo. It's fine grained and wonderful to turn:


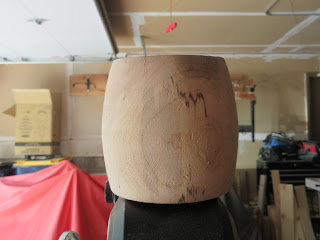
 Here's the shape. The top of the urn is the wider end on the left and the bottom is the right end:


And unfortunately here is the problem-cracking. The crack on the bottom will be turned off shortly but the crack on the top is deep and in order to remove it I'll have to substandially re-shape the urn. I'm going to think about how to approach this over night and tomorrow I'll work on it more:


See you tomorrow,
VW

Turning a Wooden Pet Urn

Hello All,

During this latest long lay off, I had a request from a friend: a cat that she owned for a long time had died and could I make her an urn for it's ashes? Absolutely yes. Here is the discussion and plans:

This project presented me with two challenges: my lathe and it's history of not working or only working for several minutes at a time and then stopping. Those of you who have followed along for a long time will remember the issues I had with the on/off switch and not being able to find another one. I finally found a switch that would work but the plastic housing the covers this switch was too small. My husband made a wooden housing and that fits over the switch quite nicely but the electrical issues still remain. I have found that if I turn below 400 rpm, the lathe seems to work and that's what I've been doing this morning. I'm keeping my fingers crossed until I can purchase a new lathe later this summer.
The other problem is wood. Owing to the shelter-in-place order here I haven't been able to purchase dry wood in person and I've run out of lumber. Fortunately I have some sections of a maple tree that fell down in a storm a few years back that I was saving for bowls and the smallest section should work well for this project. I would have prefered a different colored wood but we'll have to go with this.

Plans
Turn a pet urn, that can be re-opened in the future, out of a maple tree branch and that has approximately a volumn that equals 2 cups. Here's the photos:

Photos

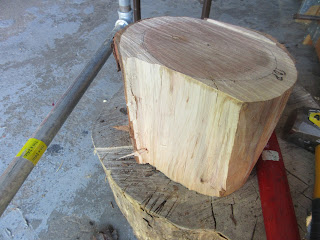
Here's the block. It's hard maple and I like to remove the bark on tree branches or trunks manually rather than take it off on the lathe. Bark collects a lot of grit, silica, nails, and other stuff that can be hard on turning chisels so off it comes with a hammer and chisel:


Here's the block without the bark. You can see the top of the block is diagonal. I'll be turning that off as I true up the block:

To reduce the weight and irregularity, which I worry could affect the ability of the lathe to turn properly, I'm removing the outer sap wood layer with a mallet and a hand axe. This only takes a minute to do:


And here it is between centers on the lathe. I've marked off the bottom and top of the urn with a parting tool. There is also a deep crack on the side that extends about 1" into the block. I'll have to see if I can turn that away in the course of roughing out. If not, this is going to be a short project as the urn must be solid:

Still turning. The crack is still visible:


Here I've removed more wood and the crack is getting smaller. The heart wood (rt side of the block) is beginning to show up:

Ahh, the crack is smaller still-I'm beginning to feel hopeful:


And wood shavings! I haven't seen that in a loooonnngggg time!

I've taken a break for lunch. Afterwards I'll continue turning and shaping the urn.

Stay tuned,
VW