Friday, May 31, 2019

The Little Free Library Project-Finish Photos and Literacy Wins!!

Hi Everyone,
I'm sorry I haven't posted this week-we had to have some unexpected concrete work done on our foundation and we've been busy with that. As the concrete was poured today and is curing as we speak, I'll update you on the Little Free Library project.

The Little Free Library was originally build last fall but the long hard freezing cold winter and tons of snow prevented us from putting it in place. And my camera broke! Well, the stars finally lined up this week-the weather is warm and dry and there were several volunteers who helped dig the post hole to place it in and so it's in place and open for business. Here's a couple of photos from a borrowed camera:

Image may contain: outdoor

Image may contain: tree, plant, house and outdoor

Image may contain: plant, tree and outdoor

So there we have it. It should hold up well this coming winter.

I'm going to paint the chair seats today and I'll finish those later next week,

Stay tuned,
VW

Tuesday, May 21, 2019

Birch Brooms - And this is the 700th blog posting!

Hi Everyone,
How many of you have ever made or used a birch broom? I was reading Robin Wood's blog a little bit ago and found this video of a broom maker in Canada.

This is the blurb that comes with the video on YouTube:

Mr. Joshua Young demonstrating how to “run” a birch broom, in Mount Pearl, Newfoundland, September 2015. Mr Young grew up in Grey River on the South-West Coast of Newfoundland near Burgeo. Mr. Young learned how to make birch brooms from his family members and continues to teach his grandchildren how to make the brooms today.


I love craft. I've got to go and find some birch and try this.
VW

Chair Seats project

Hello All,

Today I'm going to fix a problem that has annoyed me for a while now and here it is:


The most disgusting dining room chairs in the world. And this is the nice one! We bought these chairs many years ago and they've held up really well. But the last several years they've become more and more worn and now they all look like the chair in the photograph.

The frames are metal and in excellent shape and it would be silly to discard them so I removed one of the seats with the intention re-using the frame to re-upholster it. The frame is made out of some really solid hardboard and I have no way of stapling new fabric to it so that idea was out. 

I also couldn't find chair seating in the same dimensions as the existing frame. So I remembered that I had a couple of old laminated panels in the shop and given that they are about 1 1/2" pine, decided to use those.

So I used the old frame as a pattern and cut out a seat with my saber saw:


Next I smoothed the edges on the table sander. After that I rounded over the edge on the front of the seat to make it comfortable to sit on and I also smoothed all the sharp edges with sand paper:


And this is what it's going to look like on a chair:


As the panels that the seats will be cut out of are different colors, I'm planning on painting these to achieve a uniform appearance.

I need to cut out 3 more seats and figure out a pleasant color for the seats. Stay tuned.

VW


Monday, May 20, 2019

Perfume Tray-final assembly and finish photos

Hi Everyone,

Well, the monster weather we were supposed to have didn't materialize this weekend-it's bright, sunny, and calm today. Time to go down to the wood shop and finish the perfume tray. Here's the photos:

The first thing I needed to do was to attach the handles and those went on smoothly. I switched out the original handles for these longer, larger handles and I think they fit the size of the tray much better.


Next I trimmed the bottom boards to size and screwed them down to the frame:


Here you can see I counter sinked the screws so the tops don't scratch whatever surface the tray sits on:


And with that the tray is finished. Here are the final photographs for this project:


I must say I'm pleased with the way it came out. It meets the requirements set out by my friend and I think her perfume collection will not only look lovely against the grey stain, but she has room to grow her collection in the future.

Ok, this project is finished. Thanks for dropping by to watch.

Next is the dining room chair seat project which I'm going to get set up for this afternoon.

Stay tuned!

VW

Thursday, May 16, 2019

Perfume Tray continued-working on the finish

Hi Everyone,

Well the stain on the tray parts dried over night and the color looks fine:


I put the first coat of polyurethane on the surface and I suspect given that it's a warm day today I'll be able to put another coat on this evening. As this is destined for the master bathroom at my friend's home, I'll put 4 coats of poly on it to help it resist the moisture. As soon that is done, I'll put the handles on and assemble it and off it will go to her house.
Stay tuned for the finish photos.

What's Next?

I've got several large logs from trees that fell down in a storm a number of years ago. I brought them home and placed them in the shop and promptly completely forgot about them. I dug them out last week and decided to split a couple of them open to see if they are suitable for carving:

So I got my log splitting stuff out. My kids gave me that hatchet for Mother's Day some years back. Great thing to give to mom on days like that:


And here's the log. It's from a pine tree that came down several miles from here:


Nothing can resist splitting wedges and me!


There it is. Hmmm...I'll have to cogitate about this. I'm going to bite the bullet and rent a chain saw next week and cut up several more logs and see what I find so stay tuned for that.


While I'm waiting on the saw and completing the tray, I need to replace the chair seats on my dining room table:

Yes, those are beyond bad-I'd say rather grim. I'm going to remove the seats and replace them with solid wood seats from some scrap pine I have.

So stay tuned and we'll meet up again here in the shop this weekend.

Have a good one,
VW

Wednesday, May 15, 2019

Perfume Tray, continued

Hi Everyone,

Today I planned to sand the tray parts, assemble the frame, and stain everything and believe it or not I got it all done. Here's the photos:

The first thing I did was drill a hole into the edges of the side pieces to put screws into. I did that because that section is actually two glued pieces of wood and if the tray was ever dropped I was afraid those two pieces could come apart:


After that, I proceeded to drill screw holes in the ends of the frame to get it ready to be assembled:


And here is the frame assembled. Now it's time to seal the wood and stain it:


While I was waiting for the pre-stain to dry I took some photos. It is absolutely cloudless here today and just beautiful. We may have fierce winters here but our springs are gorgeous:


My friend wanted the color of the tray to be grey, with just enough color for the wood grain to show through. I have to admit I hate the color grey as my living room is painted grey and after a while it looks soooo depressing. But that's what she wanted so I used Minwax Classic Grey for the stain. I applied it and let it sit for about 15 minutes and then I rubbed it down with a paper towel and I must say I'm really pleased with the color. I was worried it would turn out to be battleship grey like my living room but it's a very soft color and there's just enough visible wood grain to make my friend happy:

These photos show the color in natural light:


And these two photos show the color in artificial light:


Ok, all the parts are drying and I'll leave all of that over night. Tomorrow I'll attach the bottom pieces to the frame and get the tray ready for polyurethane.

In the meantime, a very handsome gentleman gave me a present so I'm going off to work on my garden.

See you all tomorrow.
Stay tuned,
VW

Tuesday, May 14, 2019

Cleaned out the shop, time for a project

Hi Everyone,

Well, I think I've actually moved a mountain of stuff, dirt, and saw dust out of the shop. Gave away about 90% of the scrap wood I had and that really cleared out a lot of room. Also got rid of old wood stains, glue, and other assorted stuff I no longer need so it's time for the first project of the year.

I have a buddy in Florida who has a large collection of perfume and she needs a tray to display it all in. So after a chat online about this, I agreed to make her a large wooden tray out of pine. She also wants it stained grey and I'm attaching metal cabinet handles to make moving the whole thing a little easier. So here we go:

Photos

The tray is going to be 25" long by 18" wide and about 3" deep with metal handles on the ends. For the wooden frame and bottom I purchased an 8' long 1"x 4" pine boards and an 8' 5/16" x 4 1/2" section of pine lattice, along with 2 cabinet handles (see the photo below), and some brass wood screws:


From that I cut the parts for the frame- 2 18" parts and 2 25" long parts:


And here it is with just the pieces dry assembled on a work table:

I cut 3-25" lattice section for the bottom which were not wide enough to make a solid bottom so I took some scrap lattice from another project and cut 2-approximately 1 1/2" x 25" long additional parts to complete the bottom:


I spent some time looking at the frame and it looked a little too boxy for me so I cut 1/2" off all the boards. The sides a little lower but I think overall the tray dimensions look better:


Here's the handle-it is 6 1/4" long:


I placed the handles on top of one of the ends and didn't go for the appearance so I decided to inset the handles along the top edge of ends. It looks a little more finished that way. What I didn't want was just a box with handles on it:

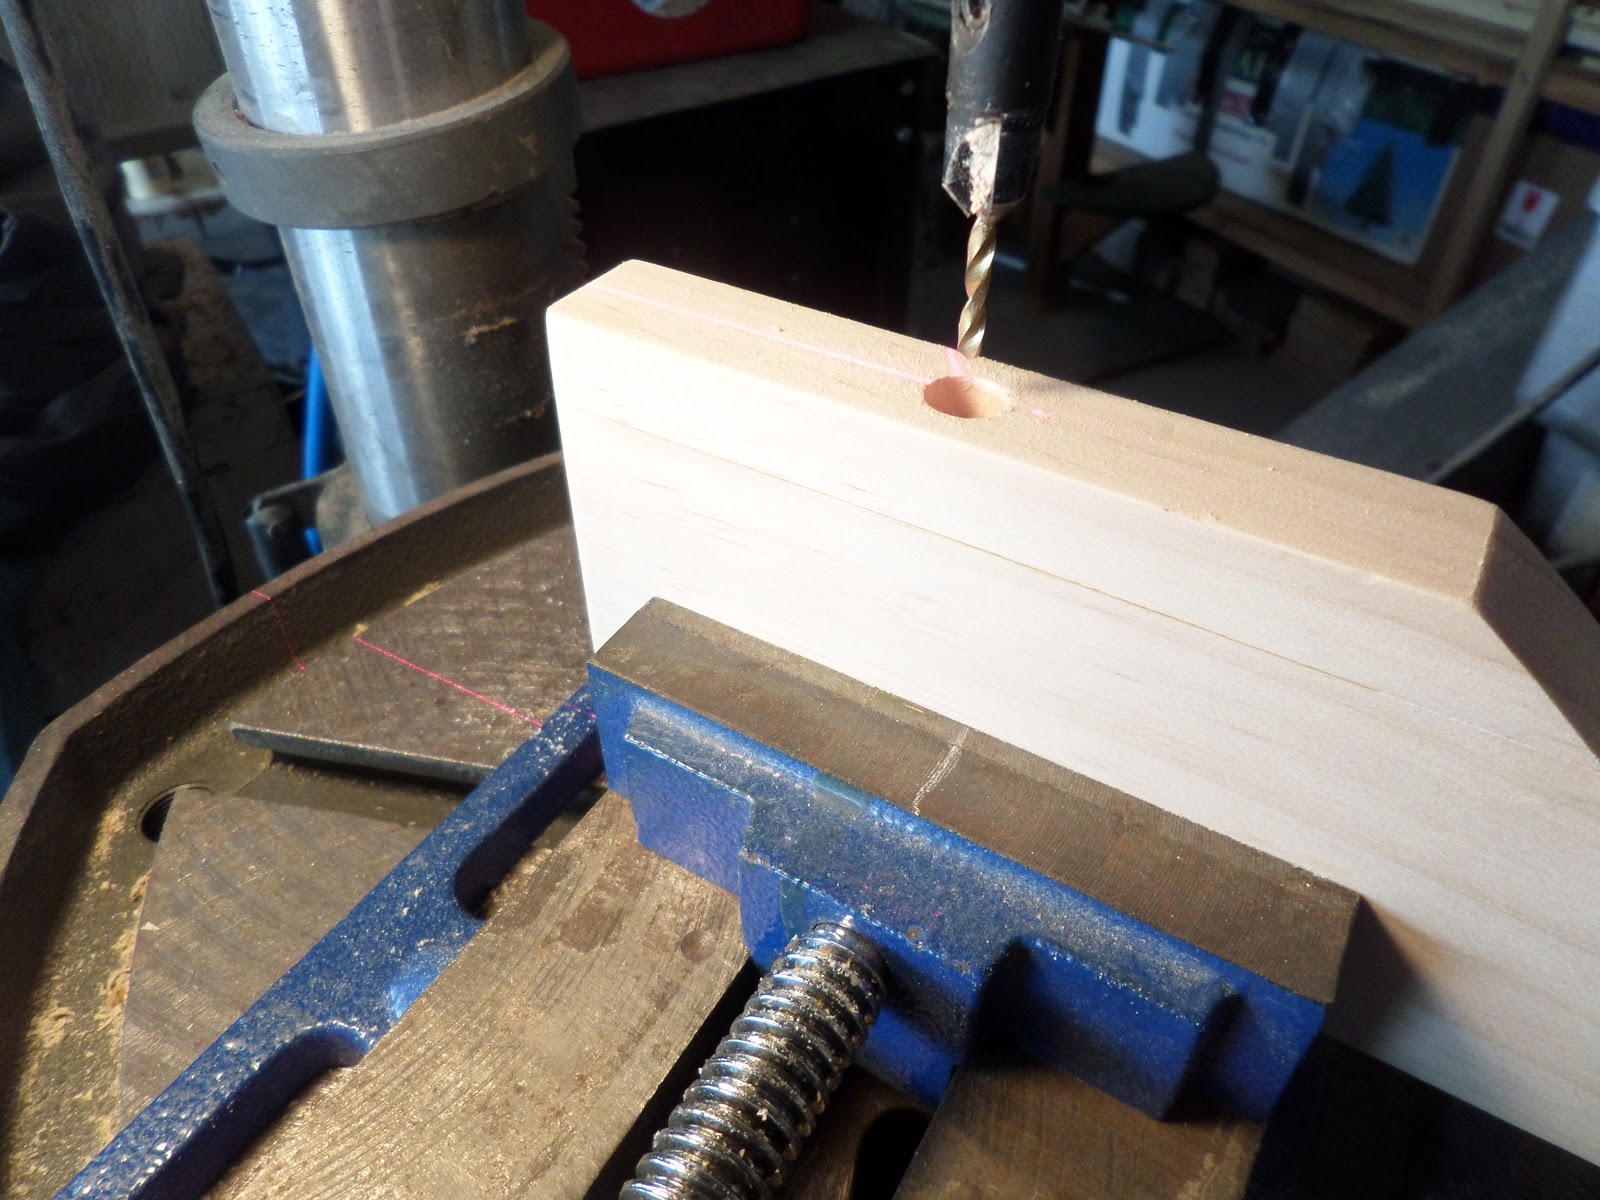
To place the handles in this manner meant I had to cut the top 1/2: off and from that 1/2" strip, cut two beveled ends which will be glued to the ends with the handle placed between them. I also had to drill holes for the screws for the handles, which took a while: 

 The screws that will hold the handles on will be inset on the underside of the ends:

And here is an assembled end board with the handle just sitting on the top edge of the board. I think that looks better than just screwing the handle down:


I'm going to glue these beveled parts down to the boards and let the whole thing dry over night. Tomorrow I'm going to assemble and stain the tray so drop by the shop again on Wednesday to see how that comes out.

Stay tuned,
VW