Hi Everyone,
Well the little library is done but done too late-it's gotten too cold to dig a hole and fill it with concrete and expect the concrete to solidify. So we can't place the post and the library in the ground this year. It will have to wait until next spring. The little library will be placed inside my home and wrapped up so the cats don't get to it. Humbug!
Anyway, it's time to close up shop for the winter. I'll be sweeping and dumping all of the unusable scrap wood I've collected and getting ready for the holidays.
I'm grateful to be back working in the wood shop and being able to do all the wood working stuff that I do. Next semester I'll be in the wood shop that is used by the cabinet making course I'm in and I'll tell you all about that as well as do other projects here on my own.
So my friends, have a wonderful rest of the year and a terrific New Year!
Best Always,
VW
Friday, November 23, 2018
Wednesday, November 14, 2018
Little Free Library build-it's finished!
Hi Everyone,
Well, here it is:

What a challenge this was-it's like building a house. There are a lot of little details (and aggravations) that went into it but it's very very strong, waterproof, and I think it could withstand a tidal wave. As I mentioned previously I live in a rugged climate with snow, lots of rain, and wind so the box had to be water tight and the finish had to be water proof and I think that's been accomplished.
The building of the box portion of the library was very straight forward and didn't really present any challenges other than running out of plywood at one point. The door however was a challenge. I built two frames and re-did the second frame and window twice before I got a door that would fit flush, keep out water and snow, look appealing from the street, and basically be destruction proof in case anyone thinks of vandalizing it. But I managed to prevail. The hinges were another difficulty as I couldn't find any hinges that were small enough to fit but strong enough to move the door multiple times without coming loose. Here's the hinges on the side of the box:


There is also a simple knob on the front and a hook and eye latch on the right hand side of the door to keep it closed.
The roof is similar to a regular roof on a house. I used construction adhesive and wood screws to attach it to the roof panels and I guess time will tell if it leaks. I don't think it will as there is a ton of adhesive underneath all of that roofing material.
The post and the framework
The post hole is going to be dug this weekend. The library itself is very heavy and so we need a very deep hole to support it, as well as a strong theft proof frame to hold the library onto the pole. And I'll let you know how that goes in a later posting.
Well, I'm glad I did it but I'm not too keen on doing another one anytime soon.
I will do a posting about the post and the frame and show you photos of it in place.
Stay tuned,
VW
Friday, November 9, 2018
Little Free Library build-nearing completion
Hi Everyone,
Well, here it is:


I still have to finish the door and put it on and there are a few odds and ends that need fixing. I think it's going to look really nice outside.
I'm going to screw and glue the Lexan pane on the door later this evening and screw it on tomorrow.
Stay tuned,
VW
Well, here it is:


I still have to finish the door and put it on and there are a few odds and ends that need fixing. I think it's going to look really nice outside.
I'm going to screw and glue the Lexan pane on the door later this evening and screw it on tomorrow.
Stay tuned,
VW
Thursday, November 8, 2018
Little Free Library Build-the roof, re-doing the door, and the exterior finish
Hello All,
Brrr, it's getting really cold outside and it's beginning to snow so my work time was brief today. Here's today's photos:
The roof:
Someone, I'm not sure who it was, donated some black roofing paper, several strips of roofing tiles, and a box of nails to the project. As I got on the last roof panel last night, it was time to put the roof on. Here's a photo of the paper in place. I held it in place with staples and spray adhesive to hold it still while I worked on it:


Here it is with the paper trimmed and in place:

I know this looks crooked but it really is straight and it' looks very nice against the brown stain:

The door
The door I made yesterday wound up not fitting the face frame-the frame inside for the Lexan panel didn't fit the inside space of the face frame so there was about a 1/2" gap between the door and the frame. So I had to make another one. It's down stairs with red paint on it and I'll install it tomorrow.
The exterior stain
I don't have a photo of the stain on the sides of the box. It's a medium brown, transparent deck stain and it looks really nice, especially with the red door next to it. I'll have to get photos of all this tomorrow afternoon.
In the mean time, I ran a screw into my left index finger so I'll need to tend to that and get some dinner.
Stay tuned,
VW
Wednesday, November 7, 2018
Little Free Library build-the door
Hi Again,
Well, the day I've been dreading has arrived-time to build the door.
The door in the plans is essentially a window with hinges, a knob, and a door clasp. I've never made a window before so I've had to improvise a lot and hope for the best. Here's the photos from today:
I debated whether to build an inset door or just to basically copy the face frame. I even consulted my husband the engineer on this one and eventually I decided to go with a face frame type door. It is bigger and heavier that an inset door would be but I think it will keep out water better so face frame door it is:

And so that's what I did. Here is the completed door from the front:

The second part of the door is the window. I have a small Lexan sheet that I'm going to use. I built a frame work around the opening in the door and I plan to butt the edges of the Lexan window again the frame and glue and screw it in place:

This is what the underside of the door looks like:


And since red is the color of welcome, I've painted the door frame red. It will look nice against the natural wood color:

Next I will attach the face frame to the box with screws and glue and finish up any other work. Then it's time to apply a finish to the exterior of the box and the frame. I'll try and get to all of that this evening. Once this is done, all that remains is the roof and apply some exterior deck stain to the pole to preserve it. And then it's time to put it in the ground.
Stay tuned,
VW
Tuesday, November 6, 2018
Little Free Library Build-interior shelves and the face frame
Hello Again,
Another productive morning-I got the interior shelves installed and the face frame made. Here's some photos of this morning's work:
The paint dried and so it was time to install the shelving and this went very well. The unit is held in place with screws and it's very strong, strong enough to hold books and it also provides a means for strengthening the cabinet:

Now for the face frame-I'm using 1 x 4" lumber for this to make the frame and the box strong:

To get the proper dimensions, I temporarily installed the remaining roof pane.It over hangs the front of the box and the face frame has to be made to accommodate this:

After measuring and cutting the parts, I assembled it with glue and Kreg screws. The joints are tight and strong:

And here it is turned over:

Here is the frame just laid on top of the front of the box. It fits perfectly:

I'm going to attach it with wood screws and wooden dowels as this will be visible from the front:

The next project involves making the door. Again, the slope of the roof as to be accommodated so the door will open.

And I'm going to use 1x4" pine for the frame. I'll also need to figure out how to attach the lexan window so it doesn't leak water:

Well, it's freezing cold right now and I'm going inside to defrost. I'll try and return this afternoon to make the door.
Stay tuned,
VW
Another productive morning-I got the interior shelves installed and the face frame made. Here's some photos of this morning's work:
The paint dried and so it was time to install the shelving and this went very well. The unit is held in place with screws and it's very strong, strong enough to hold books and it also provides a means for strengthening the cabinet:

Now for the face frame-I'm using 1 x 4" lumber for this to make the frame and the box strong:

To get the proper dimensions, I temporarily installed the remaining roof pane.It over hangs the front of the box and the face frame has to be made to accommodate this:


And here it is turned over:

Here is the frame just laid on top of the front of the box. It fits perfectly:

I'm going to attach it with wood screws and wooden dowels as this will be visible from the front:

The next project involves making the door. Again, the slope of the roof as to be accommodated so the door will open.
And I'm going to use 1x4" pine for the frame. I'll also need to figure out how to attach the lexan window so it doesn't leak water:

Well, it's freezing cold right now and I'm going inside to defrost. I'll try and return this afternoon to make the door.
Stay tuned,
VW
Monday, November 5, 2018
Little Free Library build-painting and interior shelves
Hi Everyone,
Well, I'm off to a good start today. I've got some preliminary painting done and I've assembled the shelving unit. Here's some photos:
Here is the interior shelf unit. I assembled it with 2" long wood screws. This will provide some manner of organization for the books and help to keep them upright:

This is what it looks like:

My next task was to begin the finishing process. I had a container of exterior paint in "coconut" which I think is another way of saying off-white. I painted the inside and the shelves this color so it's not too dark inside:


Then I tipped the box over and applied a coat of exterior deck stain to the underside:

I'm also adding some moulding to give the box a more finished look:


And that's where I am right now. I'm going to let everything dry and give the painted surfaces another coat of paint later on this evening. And I'll begin the face frame.
Stay tuned,
VW
Sunday, November 4, 2018
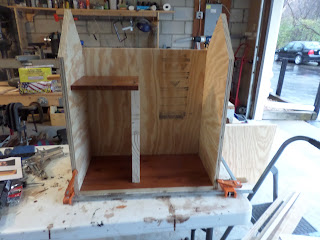
Little Free Library build-box assembly
Good Morning,
I'm outside right now and I'm doing a dry assembly of the box portion of the little library and so far it's going well. Here's some photos:
Dry Assembly
The first thing I did was begin assembling the interior shelves. There are three shelves but one of them, a horizontal shelf on the right has to be cut to fit so I haven't attached that shelf yet. The whole thing is resting on the floor while the glue dries.

Voila!! Here it is held together with bar clamps. The parts all fit except the back which you'll see the problem in the last photo:
Here's a side view:

Here's why you should dry fit parts before assembly-the rear panel is a little too long and would keep the rear roof panel from fitting snugly. If I trim off about 3/4" or so that should correct the problem.

I'm going to take the clamps off now and trim that rear panel and then I'll begin gluing and screwing it together.
Assembly with glue and screws - this is a two person job
Working with construction glue
Wow, that stuff is an adventure in and of itself to use. It is very very thick like chewing gum and it sets up fairly quickly so you need to have everything you'll need within reach before you begin.
I want a very strong library with very strong joints. I also wanted a thick glue that would help seal the joints and any little cracks where moisture could enter and I must say Liquid Nails really fills the bill with that (I'm going to send those people a nice note. Did you know that you can build a retaining wall with construction glue? I didn't know that). I also used Kreg Jig self tapping screws. I drilled a small diameter pilot hole for each screw to help guide the screw in properly and to minimize any vibration while I was drilling.
Framework for the post and bottom panel
Before I began assembling the box I added two 2x4s to the underside of the bottom panel:

The post will fit between the 2x4s:

Gluing the sides and back panels
Here's a photo of that glue. I placed a very thick bead of it on all the glued edges to fill up the joint.

Here is one of the side panels attached to the bottom. You can see how the glue has squeezed out and I'm leaving it there to dry:

Here is the rear of the back panel. We scraped off some of the excess glue:

And this is what it looks like right now with two of the interior shelves just sitting in place. One of the roof panels is glued and screwed in place as well:

Tomorrow is a busy day-
I need to install the interior shelves,
Finish the inside of the box,
Attach the other roof panel,
And get the roofing materials from my neighbor to shingle the roof.
On Tuesday I'll-
Make the face frame for the front of the box,
And make the door.
Wednesday-
I'll finish the exterior and fix any remaining problems,
Apply deck finish to the pole and let it dry,
Thursday-
Apply more finish to the exterior to make it really waterproof and let it dry.
And then it's time to dig the hole for the pole and set it in place. Maybe we'll have a grand ceremony.
Well, it's been raining and snowing here today and I'm just about frozen through and through. I'm going to sit down and have some very hot tea and defrost.
See you tomorrow,
VW
I'm outside right now and I'm doing a dry assembly of the box portion of the little library and so far it's going well. Here's some photos:
Dry Assembly
The first thing I did was begin assembling the interior shelves. There are three shelves but one of them, a horizontal shelf on the right has to be cut to fit so I haven't attached that shelf yet. The whole thing is resting on the floor while the glue dries.

Voila!! Here it is held together with bar clamps. The parts all fit except the back which you'll see the problem in the last photo:

Here's a side view:

Here's why you should dry fit parts before assembly-the rear panel is a little too long and would keep the rear roof panel from fitting snugly. If I trim off about 3/4" or so that should correct the problem.

I'm going to take the clamps off now and trim that rear panel and then I'll begin gluing and screwing it together.
Assembly with glue and screws - this is a two person job
Working with construction glue
Wow, that stuff is an adventure in and of itself to use. It is very very thick like chewing gum and it sets up fairly quickly so you need to have everything you'll need within reach before you begin.
I want a very strong library with very strong joints. I also wanted a thick glue that would help seal the joints and any little cracks where moisture could enter and I must say Liquid Nails really fills the bill with that (I'm going to send those people a nice note. Did you know that you can build a retaining wall with construction glue? I didn't know that). I also used Kreg Jig self tapping screws. I drilled a small diameter pilot hole for each screw to help guide the screw in properly and to minimize any vibration while I was drilling.
Framework for the post and bottom panel
Before I began assembling the box I added two 2x4s to the underside of the bottom panel:

The post will fit between the 2x4s:

Gluing the sides and back panels
Here's a photo of that glue. I placed a very thick bead of it on all the glued edges to fill up the joint.

Here is one of the side panels attached to the bottom. You can see how the glue has squeezed out and I'm leaving it there to dry:

Here is the rear of the back panel. We scraped off some of the excess glue:

And this is what it looks like right now with two of the interior shelves just sitting in place. One of the roof panels is glued and screwed in place as well:

Tomorrow is a busy day-
I need to install the interior shelves,
Finish the inside of the box,
Attach the other roof panel,
And get the roofing materials from my neighbor to shingle the roof.
On Tuesday I'll-
Make the face frame for the front of the box,
And make the door.
Wednesday-
I'll finish the exterior and fix any remaining problems,
Apply deck finish to the pole and let it dry,
Thursday-
Apply more finish to the exterior to make it really waterproof and let it dry.
And then it's time to dig the hole for the pole and set it in place. Maybe we'll have a grand ceremony.
Well, it's been raining and snowing here today and I'm just about frozen through and through. I'm going to sit down and have some very hot tea and defrost.
See you tomorrow,
VW
Saturday, November 3, 2018
Little Free Library build-cutting the parts
Hi All,
Well, it's been a long day but the parts for the box part of the little library are cut out. And if you very carefully layout the parts on the plywood, you can get all the large parts out, except the bottom panel, of 1/2 sheet of plywood.
So here's where I'm at:
The roof panels
The bottom panel
Both sides
and the rear panel.
I made the interior shelves out of some thick pine I had left over from another project.
Here's the photo to prove I did something today:

And here is the post and the 2x4's for the frame to attach the library to the post:

Now tomorrow I'm going to begin assembling the box with construction adhesive and screws. I haven't cut out the parts for the face frame or the door yet as I want to make sure the given dimensions are correct for the box. I'll probably do that tomorrow too.
Ok, now for a hot shower and some food!
See you tomorrow,
VW
Friday, November 2, 2018
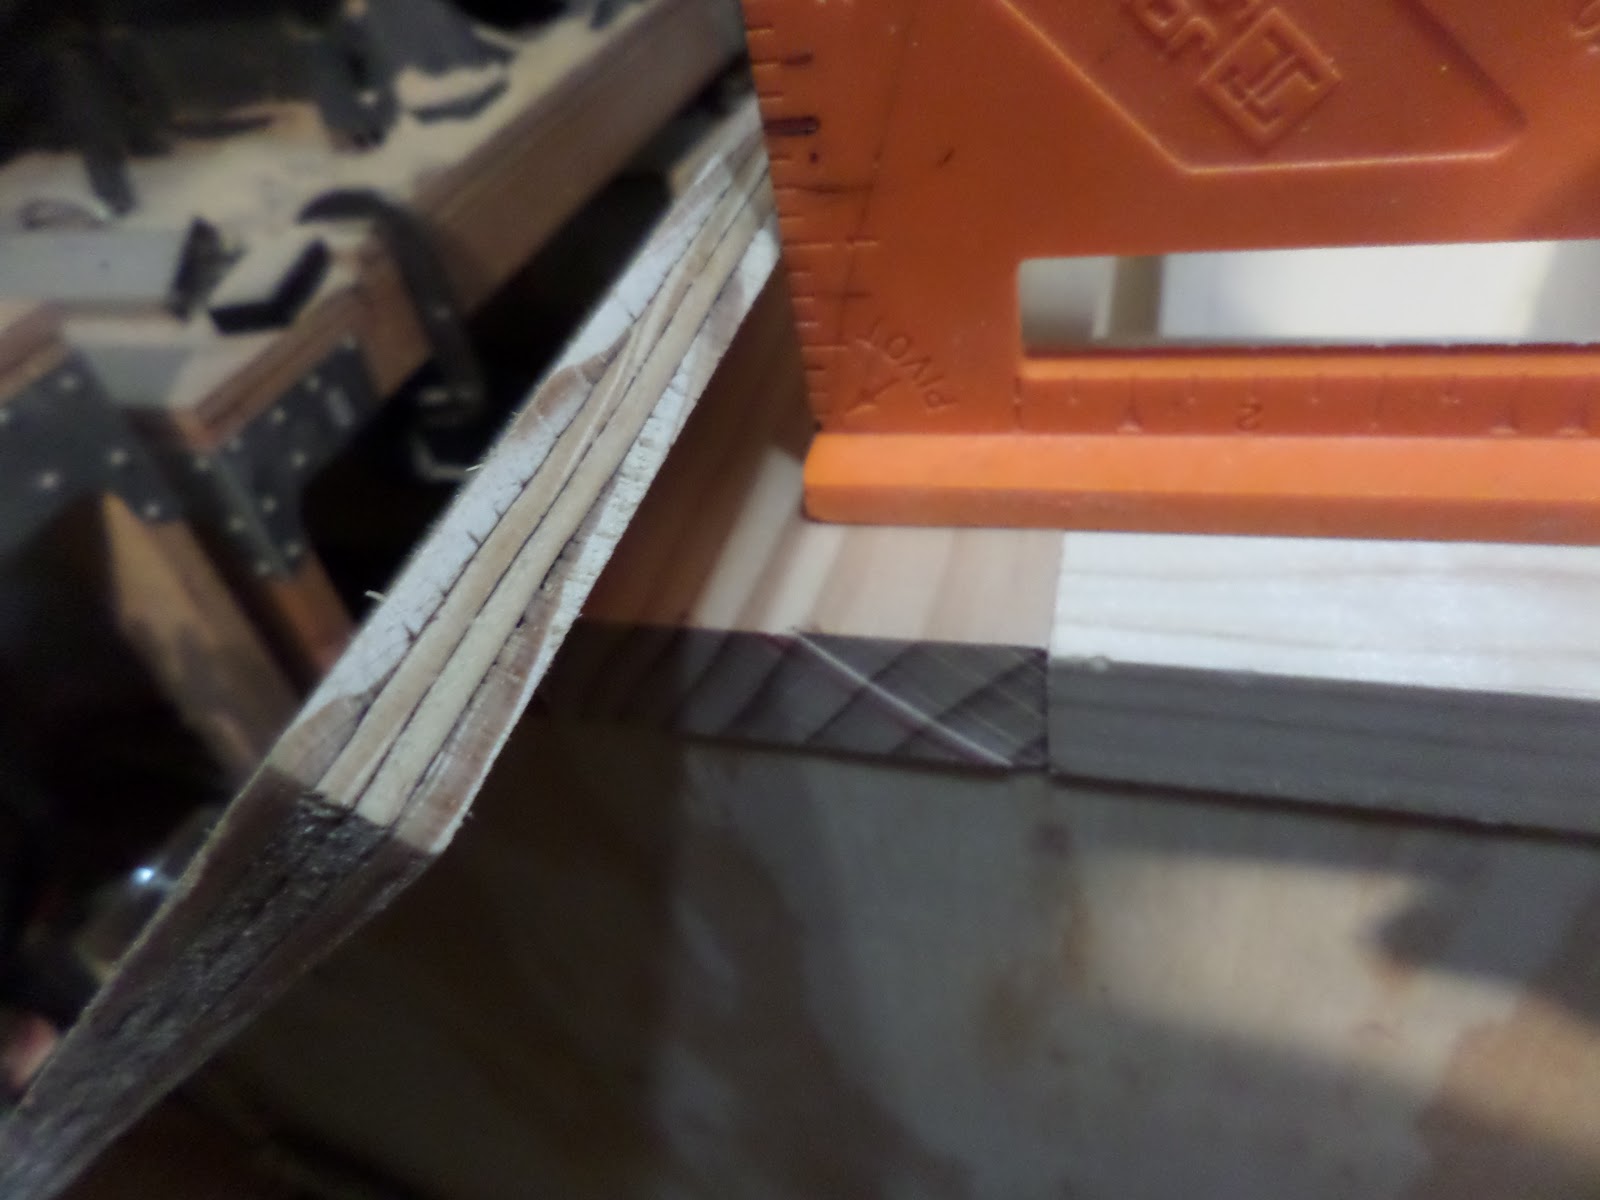
The Little Free Library Build - Layout and marking up the plywood
Hi Everyone,
Time to begin the last project of the year. Let's take a look at the plywood and chat a bit:
I took the plywood panel and set it up on the saw horses. It has a soft, sued-like surface so I scraped it smooth with a cabinet scraper and then I began marking it.
The back panel is 20" wide and 20.75 inches high-this is going to be a big box! I had just enough plywood left for one of the side panels and two of the interior shelves. I'll have to go and get another piece of plywood to cut the other side and the roof panels. I'll use some scrap solid wood for the base.

Marlys, my neighbor and partner in crime in all of this, supplied me with a big, solid 4x4 for the post. And I think the exterior, and interior, are going to be coated with several coats of PPG deck sealant to make it waterproof inside and out. That leaves the door frame which I think I'll paint red, the tradition color of welcome.
It's getting cold so I'm going to quit for the evening. Tomorrow I'll finish marking everything and cut out all of the parts.
Stay tuned,
VW
Making a Train Table for my Grandson-Completion photos
Hi Everyone,
Well the train table is finish and my grandson has a new place to play with his wooden train set. Here are the photos with comments:
I finished the top yesterday-both the top and the underside of the table top have a stain and polyurethane finish and the color and the finish look fine.
For the legs, I've constructed two sets of legs out of galvanized 1" plumbing pipe. It's strong and it's a quick and dirty way to make a framework for the table:

This photo shows the legs just before I screwed them down with #8 1" wood screws:


And to finish it off I attached silicone rubber bumpers on the corners so my grandson doesn't crash into them:

And there it is-that's enough room for all his train gear:

Next spring I'll build a wooden framework underneath it so it looks a little nicer. But that's it.
_____
I'm going to stop and eat dinner and then begin working on the Little Free Library.
Thanks for dropping by and stay tuned for the next project.
VW
Well the train table is finish and my grandson has a new place to play with his wooden train set. Here are the photos with comments:
I finished the top yesterday-both the top and the underside of the table top have a stain and polyurethane finish and the color and the finish look fine.
For the legs, I've constructed two sets of legs out of galvanized 1" plumbing pipe. It's strong and it's a quick and dirty way to make a framework for the table:

This photo shows the legs just before I screwed them down with #8 1" wood screws:

Here is the table with the legs attached:

And to finish it off I attached silicone rubber bumpers on the corners so my grandson doesn't crash into them:

And there it is-that's enough room for all his train gear:

Next spring I'll build a wooden framework underneath it so it looks a little nicer. But that's it.
_____
I'm going to stop and eat dinner and then begin working on the Little Free Library.
Thanks for dropping by and stay tuned for the next project.
VW
Subscribe to:
Posts (Atom)