Thursday, July 30, 2020

Side Table project-putting the parts together

Hi Everyone,

Well, it has been a crazy busy week this week and I've working on the table project a bit here and there. Today I assembled the framework and it's coming out better that I had hoped. Here's the photos:


Ok, here is a photo of the framework with the table top just sitting on top. I like all the dimensions and other than trimming the edges of the top, the construction of the table is finished:


These next two photos show the frame without the top. I used Kreg screws to assemble it and I must say the frame is very sturdy and doesn't wobble.

You can also see that the insides of the aprons and stretchers need to be stained. I forgot to do that...


And here it is. 
I still have to finish staining the wood, clean up the edges of the top and stain that and then last of all putting the polyurethane finish on it. 


So there's a bit more to do here. I'll get it finished and post the completion photos.

VW

Friday, July 24, 2020

Side table project, continued-continuing the staining process

Hi Everyone,

Ohhh, it's hot and humid here today and will be for the weekend. So I went down early to get some work done on the table-here's the latest set of photos:

These are the table parts that dried over night. They are a little bit deeper in color than yesterday so I think I'll stick with this stain:


Here's the table top and the legs. The color of the top doesn't show very well in this photo but if you look at the legs, it's a little more pronounced:


The orange color of the Douglas fir looks pink with the gold stain on it:


Now I wanted a deeper color for the table so I took one of the aprons and applied a second coat of the same stain and it did deepen the color. I'm going to let everything dry today and tomorrow I'm going to rub everything down and apply a second and possibly a third coat of stain and see how it looks:


Stay tuned,
VW

Thursday, July 23, 2020

Side Table Project, continued-staining the wood

Hi Everyone,

Well today I finished sanding everything and proceeded to begin the finish/staining process. Here's today's photos:

The following 3 photos show all the parts-the legs, the aprons and stringers, and the top. Everything is sanded and ready to have a wood conditioner applied to it:


Here are the aprons and stringers that have had wood conditioner applied to them. The conditioner has an amber color and sometimes the wood looks perfectly fine with just that on it:


I let the wood conditioner absorb into the wood and then I came back with a can of Minwax puritan pine wood stain and applied that. The photo doesn't quite show the color but it's a golden pine color now. I must say I'm not too keen on the color thus far and I'm not too sure what to do. I'll sleep on this over night-I might re-stain it with the pine stain or apply a darker color over this:


Soooo, I'll give it some thought tonight,

Stay tuned,
VW

Tuesday, July 21, 2020

Side Table project-the legs, continued

Hello All,

I came home from running an errand this morning and went right back to work. I'v cut out all the legs and I'm in the process of sanding them smooth. Here's today's photos:

I took a look at the table legs and measured them against two other bedside tables I have in my bedroom and it seemed to me that the legs were too long so I cut off 1 1/2 off the foot of the leg:


The table lets are now 21 1/2" long which will result in a lower and better looking table:


After I cut the legs down, I started sanding the surfaces. The cut surfaces are quite rough from the bandsaw and the curved surface was really really rough. I tried using a cabinet scraper on the surface but it really didn't help much so I got out my palm sander and that really made short work of this. I'm currently using 100 grit paper but I'll move up to finer grits as I go.

The two legs on the left in the photo are unsanded and the two on the right hand side are sanded. They look nice:


Now tomorrow, I'll finish sanding all the parts. Then it will be time to think about the staining part of this. I'd like a golden brown color so I'll have to hunt around for that. After the parts are stained, I'll put a coat or two of polyurethane on the surfaces and then begin assembling the project.

Stay tuned,
VW

Monday, July 20, 2020

Side Table project-the legs

Hi Everyone,

Time to make the table legs. 

I used a 4x4 that I had left over from a previous project and it's a Douglas fir 4x4x8'. The scent filled the air in the shop. So I could get photographs of the sequence, I roped my husband into doing the cutting today. Here are today's photos:

Here he is cutting the 4x4 down to 4 24"long sections on the mitre saw. That saw really made short work of that:


The 4x4's a too thick to be used for this table as is so we ripped them down on the table saw to 2 3/4" x 2 3/4". This also took off the beat up surfaces of the 4x4s and cut away the rounded corners so they now have a cleaner look to them:


As these legs are longer than the prototype I made last week, the curve and the sloping line had to be redrawn and here you see my husband doing that:


Here's one of the legs, marked and ready for the bandsaw:


And here is one leg cut and ready for sanding. 

As it's hot and miserable outside today, I packed it in early and came inside for something cold to drink. I'll finish cutting out the other three legs tomorrow.

Stay tuned,
VW

Sunday, July 19, 2020

Side Table Project

Hi Everyone,

I hope you're all having a good summer inspite of the pandemic. I know it is spiking in many areas of the world. Please stay safe and well.

I need a side table between two chairs in my living room. Up till now we've been using an apple crate, which is charming, but it is time for something more formal so here we go.

I am going to build a square 24" x 24" x 24" table out of pine. It will have a top made out of laminated pine boards, a second shelf below that, and best of all, it will be made out of some scrap pine leftover from the previous coffee cup shelving project.

Now normally, my furniture has been fairly simple both in the construction of the piece and in it's appearance. That is mostly a reflection of my rather limited equipment and ability. But now that I have some newer equipment I can add more detail to the things I make and hopefully make them a little more attractive.

So here goes. Here's today's photos and comments:

This is really going to be simple-here are the aprons and stretchers for the table:


Here is the table top. I'm going to be cutting that to size after I've made the frame:


Here is a photo of a leg. I made a sample to see if I could make a curved leg instead of just a simple straight leg and it turns out I can. This leg is only 12" long. The ones I'm going to make will be about 23" tall and I have a leftover 4x4 from several years ago that I'll use. 

A 4x4 is too thick and heavy for a table of this size so I'll be ripping it down to approx. 2 1/2" x 2 1/2" on the table saw.


Here's a photo of it standing up. The straight surface will face the inside of the table and the curved surface will fit the outside. More about that later.


I'm going to let the glue on the table top dry over night and tomorrow we'll see what it looks like.

Stay tuned,
VW

Tuesday, July 7, 2020

Coffee Cup Shelves-completion photos

Hi Everyone,

Well, it's been quite a week and a very very hot humid day. My left knee is a mess and I see my surgeon tomorrow. I've been scrambling around trying to get some projects done and the house clean in case I need to have some surgery. Since this project had been delayed for such a long time, I got up early today and finished it. I'm hot, tired, and a little dehydrated but the project is finished. Here's the photos:

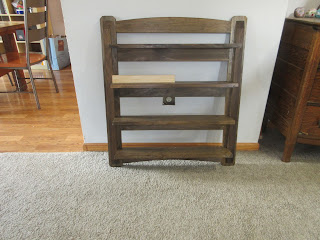
When last you saw this, it was a pile of parts. I got everything stained with Minwax black walnut wood stain and while I normally am not real big on dark brown stains, I like this one. It went on very well and I am most pleased with the color. And it has several coats of Minwax polyurethane as well.

There are four shelves for coffee cups and bags of coffee. The final dimensions are 34 inches long 31 inches wide and the shelves are 5 inches wide, big enough for lots of stuff:


And here's a side view:


I think we can call this one done. My husband is going to take it over to the daughter-in-law's place later on and hang it on the wall for her.

What's next? If my knee doesn't require any thing done to it, my next project is a couple of side tables for my living room and a chair to go along with them. 

Thanks for dropping by and keep your fingers crossed that the knee isn't as bad as it seems.

Until next time,
VW

Saturday, July 4, 2020

Coffee cup shelves, continued: staining the wood

Hi Everyone,

Well the sanding is finished so it is time to seal the wood and stain it. I used Minwax stain sealer and black walnut wood stain for the project.

I'm going to let the boards all dry and this evening, I'll turn them over and stain the undersides of the boards. Here's today's photos:


Here are the unstained parts:


And here are the stained boards:


Now if all goes well, tomorrow I'll give the boards a coat of polyurethane, let that dry, and then apply a second coat. After that I'll assemble it and it will be done.

Stay tuned,
VW

Friday, July 3, 2020

Coffee Cup Shelves, continued-cutting shelves and sanding

Hi Everyone,

Well today I finished cutting all the wood for the shelves. I dry fitted the framework and cut the shelves to measure and notched the corners of the shelvs so they would fit snugly into the framework. After that I sanded everything and later this evening I'm going to seal the parts and stain them. Here's today's photos:

Here's the photo of an individual shelf-It's 5" wide and I sawed a 1/2" x1" notch out of the rear corners:


Here's how the shelf fits into the frame:


And here is a photo of the coffee cup shelves all dry fitted together: 


After this I did the sanding and took a piece of scrap wood and stained it with Minwax Black Walnut wood stain. I did it twice and got a good result:


As it's really hot outside, I'll probably go out later when the sun is setting and stain the wood. Tomorrow I'll begin putting the finish on.

Stay tuned,
VW

Thursday, July 2, 2020

Coffee Cup Shelves

Hi Everyone,

Here's a new project: a coffee cup shelf rack for cups, bags of coffee, and other stuff. I have one in my kitchen and my daughter in law asked me to make her one so here goes:

Discussion and Plans

My daughter in law has lots of mugs and needs extra space to house all of them in her kitchen along with some spice containers from her spice rack. So I decided to help her out and make her one out of pine. 

The coffee cup shelf I made is a box with shelves and I don't think it's the most elegant thing I've ever seen. It looks like a big boxy thing with cups in it so to avoid that, this rack won't have a back and will not really have any side either (see below). 

So I went to the big box store and got some 1"x 6"x48" select pine boards, a fresh can of Minwax polyurethane, and some black walnut stain (she wanted dark shelving to match the cabinets in her kitchen) and got to work. 

Here's some photos:

Here is the framework for the rack. This will all be visible and stained dark brown. The shelf below is only a piece of scrap wood to give you an idea where the shelves will be placed. The actual shelves will sit on the side rails and be a little bit wider:


 In the next two photos you'll see that I was working on cutting out the parts for the rack. It's been beastly hot here and after I finished cutting, I gave up and went inside. Whew! It was tough out there!


Now tomorrow I'm going to cut out the shelves and then dry fit the whole thing together and check on the fit of all the parts. After that I'll take it apart and stain everything and let it dry. Later this weekend, I'll assemble it and we'll see what it looks like.

Stay tuned,
VW