Wednesday, August 31, 2011

Finished bowls

Hi Everyone,
You're gonna love this--I went downstairs to finish the bowls and have a quiet cup of coffee and I took a drink of the coffee and I think I swallowed a wood chip! I hope it doesn't take root.

Here are the finished bowls:


Notice the strategically place apple...

Anyway, this closes out this project. I have several large bowls to make over the next several weeks and I'll post pictures and spine tingling narrative to go along with it. Oh, and I'm going to be making a bowl that will be raffled off this holiday season and I'll post lots of details about that.

So, I'm going to go and have some wood-free coffee and sit for a while.

As always, have a great day and thanks for stopping by.

VW

Sunday, August 28, 2011

Next Project: Laminated turning blanks

Hi All,
Here is another project for a lovely late summer afternoon: turning a bowl from a laminated turning block.

Solid wood bowls are lovely to make and to look at but solid wood blanks that are deep enough for a bowl are expensive and unless a wood turner has the ability and the tools to core out the center of the bowl, most of the wood that makes up the blank will wind up being turned off--essentially you will wind up with a big pile of wood shavings.

An alternative to some of this (it doesn't solve the wood shaving problem) is to use laminated turning  blocks. These blocks are made up of different colored woods, usually scrap lumber left from some other project, and that are glued together into a block which can be sawed into a round shape and turned on the lathe:


There are some disadvantages to this type of blank: you have to be careful in gluing up the pieces. You must be sure to coat the surfaces of the boards completely with a good quality glue and clamp them securely for at least 24 hours. The direction of the grain needs to run in the same direction and you do need to use wood types that are similar in hardness. Using soft and hardwoods together isn't a good idea as the softwood will cut more quickly than it's harder neighbors. This results in a very uneven surface.  The other major drawback is the resulting bowl won't have the beautiful grain patterns that you can only find in a solid block of wood.

But there are advantages. Using kiln dried dressed lumber reduces the problems with cracking and warpage that you can have with a solid block. Also you can greatly affect the final appearance of a turned piece by using laminated lumber. And you can use up small pieces of wood so this cuts down on waste and expense.

Let's take our above block and do a little turning:


You can see the outside beginning to take shape and I've also cut a foot into the bottom. Since you've seen me turn many bowls, I'm going to dispense with all the in between photos and show you the finished bowl:

Here is the finished bowl next to a similar block:


This turned very well. I used maple and walnut together and they turned well together and these two woods also give a good color contrast next to each other.

I'm going to take the bowl upstairs and apply a food safe finish to it and then tomorrow I'll place it back on the lathe, and polish it with beeswax.

See you tomorrow,
VW

The Drinking Bowl: Turning the bowl pt. 2

Hi Everyone,
Well, I went down to the work shop and took a long look at the bowl and did a little measuring as well and it turned out that there wasn't a lot of wood left between the ends of the screw holes and the bottom of the inside of the bowl. So I turned the bottom more convex a couple of millimeters. This deepened the bowl, improved the appearance, and added a little more volume. Here's what it looked like immediately afterwards:


And I decided to stop there. It's not worth the risk of cutting into the screws and ruining the bowl. I sanded and oiled it and here it is at present:


I'm going to oil over the next several days and give it a beeswax finish at the end and polish it. I'll post more photos when it's done.

VW

Friday, August 26, 2011

The Back Owie continued

Hi All,

A couple of people have inquired re my back problems of earlier this summer: I'm doing much better and I'm up and doing well. I'm doing some PT right now and I'm feeling the best I've felt all year.

Having a little down time was actually great. I had time to find all of my favorite doo-wop and surfer music videos on YouTube. And I found Lesley Gore too! So in spite of the sore back, I had some fun too.

Thanks,
VW.

The Drinking Bowl: Turning the bowl

Hi Everyone,
Well, I went downstairs and took a look at the bowl blank...


...and I decided to take it and put a small faceplate on the bottom and turn it. And you can see the set up here:


As I indicated yesterday the mahogany layer will form the rim of the bowl so that is the top and the bottom layer of red birch is the bottom layer. I'll cut the foot of the bowl from this layer in a minute or so.

I began the turning of the outer surface of the bowl and after several minutes of turning, here is what it looked like:


...and you can see how smooth it is compared to the top photo.

Now I'll flip the bowl around and finish the outside and the foot of the bowl. Here we are after several more minutes of cutting. You can see how smoothly cut the exterior is and you can also see the rounded shape like the light blue bowl in my previous posting:


Time to flip it over one more time and begin hollowing it out. You can see that I've left a cone-shaped section in the center. This cone helps to steady the bowl while it's being turned:


In the above picture you can see how I've cut into the next, lighter layer of birch.

Here is the bowl after about 10 minutes more turning:


You can see how the bowl is deeper and the cone is smaller. I went ahead and cut the bowl down more deeply and I thinned out the walls of the bowl:


I've smoothed the walls of the bowl and rounded the edges of the rim--see how the mahogany turned out?

I'm going to stop here for now and contemplate--should I deepen the bowl some more? If I do I run the risk of cutting into the metal screws that hold the bowl on the faceplate. This could damage my tools and leave holes in the bottom of the bowl. Deepening the bowl will increase the volume of the bowl and it will look better. So what to do-leave it or take a chance?

Come back later and find out!
VW

Thursday, August 25, 2011

Next Project: The Drinking Bowl: Discussion and Plans

Hi Everyone,

As I mentioned in my earlier post, our next project will be a drinking bowl.

Now, what is a drinking bowl?

In the Middle Ages and probably earlier, Northern Europe and the British Isles made their kitchenware out of wood and it seems from relics that have been recovered, most people used bowls for eating and drinking. These areas also had a long tradition of wood turning on pole lathes, a lathe that utilized the natural springiness of tree saplings to power a lathe (there are many pole turners on the Internet and one of the better known is a gentleman named Robin Wood, who is located in the UK. He makes a living turning bowls and plates and other stuff with a pole lathe and you can see how he does this by going to YouTube and searching for Robin Wood Bowls. He has a series of videos that show how this is done). Since very few people owned tables at this point most bowls had a very rounded shape so people could hold them comfortably in their hands. Contrast this with bowls that are produced in contemporary times- these bowls have a much flatter shape with a wide foot. This is because these modern bowls are designed to be used on a table.

See this photo:


The dark blue bowl has a much wider foot than the light blue bowl and it's the design of the light blue bowl that we're going to try to emulate:


So here's what we're going to do: We'll go down to the workshop and get some scrap red birch and some scrap mahogany and mark it for cutting:


Since our light blue bowl is about 5 inches in diameter, we'll cut out our blanks about 6 inches in diameter:


Next, we'll coat them well with Titebond glue and stack them together. I'm going to place the mahogany blank on the top so the bowl will have a dark red rim:


And lastly we'll clamp them together:


Hmmmm.....this looks like a large wood cookie with glue for icing.

The label on the glue bottle says to leave this clamped for 24 hours so we'll come back tomorrow evening and take the clamps off and see how we're doing. If all is well we'll place it on the lathe and begin turning a small drinking bowl similar to the light blue bowl in the photo. Red birch and mahogany both turn very cleanly so I'm anticipating a nice present for my friend.

See you tomorrow,
VW

Drinking Bowl

Hi Everyone,
I'm going to make a small drinking bowl based on the drinking bowls used in medieval Europe for a young friend who studies the history of the continent :). I'll be downstairs in the shop later this afternoon to assemble and glue up a bowl blank out of some scrap lumber in my wood pile. So drop by this evening and let's start a new project.
More later,
VW

Monday, August 22, 2011

Our 30th Wedding Anniversary Today

Hi Everyone,

Today is our 30th wedding anniversary and I just want to thank my husband Jim Woodcock for 30 terrific years: You're a great husband, father and my best friend and you always will be. 


VW

Saturday, August 20, 2011

King Tut at the Science Museum

Hi Everyone,
Well, I just came back from the King Tut exhibit and if you haven't gone yet (I'm referring to my friends here in the MidWest) you really need to get over there and see it. The artifacts are amazing--lots of statues, wooden furniture, and gold, gold, gold! Wow, they even had King T's golden sandals! The displays were well done and you can walk around most of them and see all the detail up close-you can still see the tooling marks on some of them.  The ancient craftsmanship was excellent, especially with the jewelry. And they had a replica of King T's mummy--he must have been a small chap. Anyway, it was really worthwhile to go. And I got a genuine King Tut coffee mug at the gift shop--made in Thailand--a fitting end for a great exhibit.

I'm going to go and make myself some tea and drink it out of my King T mug and conjure spirits for a while....and I've got to get me some of those sandals....

More later,
VW

Thursday, August 18, 2011

The Coffee Scoop-What Happened...

Good Morning All,
Well, I went outside and checked on the state of the collet chuck and the glue was dried and the whole thing seemed strong enough to withstand turning on a lathe, so I placed the oak blank in the chuck and put the whole thing onto the lathe:


I checked to make sure the handle cleared the bed of the lathe:


And then I turned the lathe on just to see what happened. It worked without incident:


Well, so far so good. Time to set up the tool rest and cut away the face of the blank:


And what do you know--it worked! I continued to shave away at the face of the blank, very gently, until it was flattened. Then I took a drill bit and cored out the center of the blank, both to establish a center in an eccentric turning and to eliminate having to cut out more wood and possibly making the blank unstable and thus make it pop out of the chuck:


Here we are several minutes into the turning and after I've cored out the center:


As you can see the center and the blank are not lined up well. Oh well, it's a prototype. Here we are several more minutes into the turning:


I turned it down and emptied it out and that went uneventfully. I just did it gently and slowly, bit by bit and here it is:


And it really does hold coffee!!


Analysis:

Well, the process works but the final product has a lot of flaws in it. The blank wasn't completely round and I used some scrap red oak which is a coarse wood and not the best for this type of small turning. On the good side, the chuck does work and so does this process so I'm going to keep the chuck and try it again with harder, finer grained wood and see what happens. I am also going to carve one by hand and compare the results with the one in the photo. That will be a future project and I'll keep you posted on that.

Now here is a picture of the black ash bowl from last week. This did turn out well:


I'm going to deliver this to it's happy owner tomorrow.

Our next last project for the time being will be a platter made from Phillipine mahogany. It's a soft pink in color and softer and more light weight than some of the woods we've used this summer.

Well, I'm going to take my coffee scoop and go and make some coffee and sit down a bit.  Have a great day and as always, thanks for stopping by.

See you soon,
VW

Wednesday, August 17, 2011

Wooden spoons continued

Hi Everyone,
Well, I've checked on the collet chuck downstairs and I'm going to leave it alone until tomorrow. I want to make sure the glue is really, really dried before I use it. So the coffee scoop is continued until tomorrow.

The wooden spoons

The spoons have to be hollowed out and to do that I'm going to use hook knives. These are made in Sweden by a company named Mora. They make all sorts of really sharp stuff:


These are sharp on both edges and are used for general hollowing out. So I'll work on the mahogany on first. Here it is after about 10 minutes of carving:


Hmmm....looks like a wooden lollypop...

Take a look at the point on the end of that knife. Wow, those Swedish spoon carvers must be a tough lot!


Here's the spoon after about 15 minutes more carving. I've placed my wedding band inside so you can judge the depth:


Here's the spoon after several more minutes of carving. I can't imagine why someone would design a spoon like this...?

Well, I'm going back outside and work on the next one.

More later,
VW


Making a Coffee Scoop/Small Diameter turnings & the Walnut Bowl is done

Good Morning Everyone,

I got up early today and re-started the coffee scoop project. Here's how it went:

I decided to remake the wooden base for the pvc collet chuck. The original one was made out of pine and it didn't look nearly strong enough to withstand the shearing forces produced by a lathe. So I discarded it and remade it out of some red birch:


Since it was rather rough on the edges, I decided to round it down and promptly broke it:


Good grief. Since the rest of it was in one piece, I decided to use it temporarily as a holder while I worked on the pvc portion of the chuck.  I inserted the pipe into the slot on the birch base and placed another piece of wood on top of the pvc pipe and placed the whole thing between centers to mark and drill it:


The walls of the pipe will have slots cut into them and also a large hole-slot drilled and cut into it to allow the handle of the scoop to protrude while the piece is being turned. So I marked and drilled and cut  into the sides of the pipe with a drill and a hack saw:


The black lines are the cutting lines:


And here is a photo of the completed chuck with the hose clamp in place:


With that done, I removed the broken base and re-made it out of a piece of solid maple. Here is a photo of the completed chuck:


I glued the pipe and the base together and they are drying in the shop.

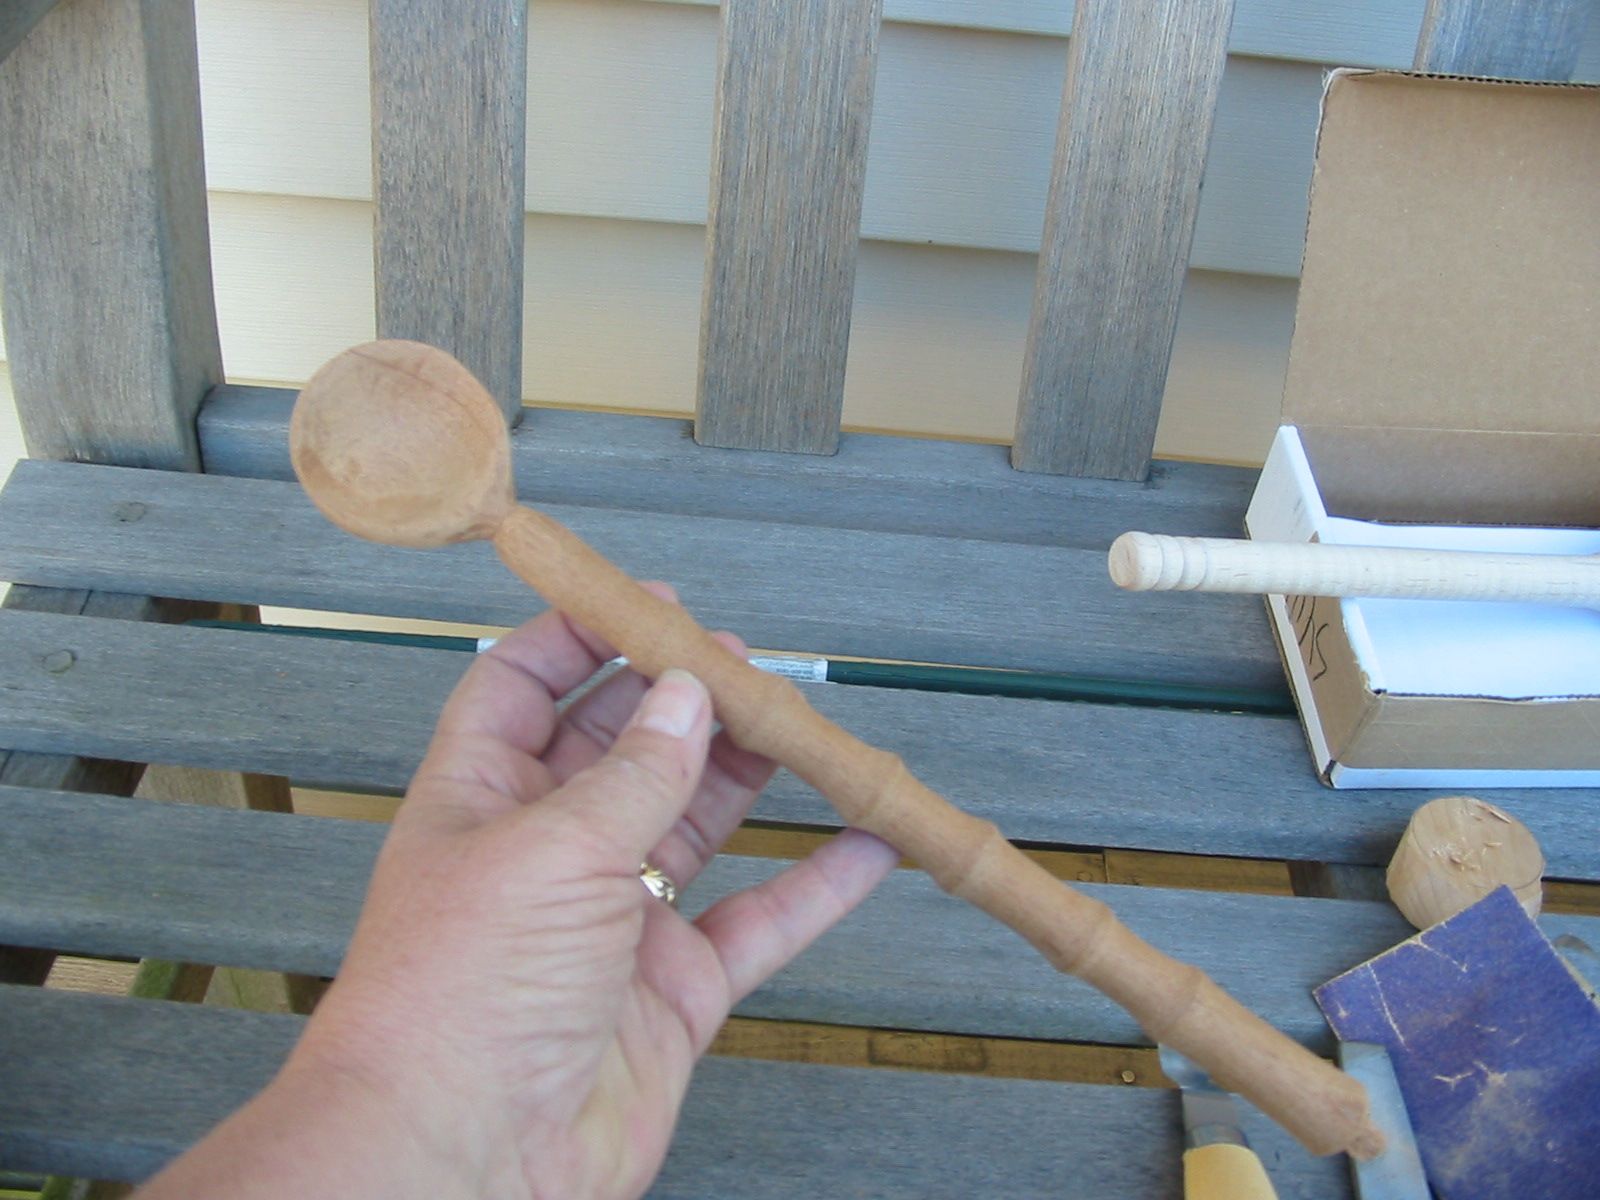
Meanwhile, back at the ranch, I turned our red oak scoop blank down more:


Hmmm...now it looks like a small lemon on a stick and the reason it does is that the x, y, z axis of the piece are not equal in length, or in other words, it isn't round yet. So back to the lathe we go for more turning, sanding and finally I cut it off:


...too soon. It's too large to fit into the pipe. So I'm going to manually cut down the ends of the blank until it fits. Oh well, it's a nice morning to work outside.

Now it fits, very tightly, but it fits:


When this is placed back on the lathe in a couple of hours, I will shave off the top of the scoop and then hollow it out. If all goes well, I should wind up with a scoop with the handle attached. The glue really needs to dry hard so I've removed the blank and I've set it aside. I'll go back to it later this afternoon.

In the meantime, I finished the first walnut bowl. Here it is:


And here is a side shot:


It's been polished and it's ready for delivery. I'll have to plug the holes in the base where the screws for the faceplate were drilled but that will only take a minute. I'm going to go and email the happy owner.

I'll be doing another posting later today so stay tuned.

VW