...I miss my bandsaw....
Tuesday, June 25, 2013
Monday, June 24, 2013
Mis-adventures in the Wood Shop-Working with Green Branch Wood/Discussion and Plans
Hi Everyone,
...sigh...
Whenever I begin a blog post like this it's a big tip off that something went astray today...but I'll talk about branch wood first.
We have had a lot of strong storms pass through Minnesota the past week and a number of trees and tree branches have come down as a result. While this has caused headaches for a lot of homeowners and businesses it has been something of a wood-collecting boon for me. I've been driving around and I've collected several large branch sections for use in the shop.
Probably a lot of this wood will become spoons as wet wood is much easier to carve than dried wood is and I made several spoons last week. This week I thought I would use some of the larger branches for boxes, which leads me into my next story.
Amongst the many activities my church parish* engages in is a series of annual art shows that showcase the work of area artists. We get to see original work and the artist gets a chance to make a sale and this is a good thing all around. I was told about the fall show which will have spirituality and art as its theme and I decided to enter. I normally don't enter shows but I think one or two of my tea boxes might stand well amongst other types of art. So I'm going to be making two boxes and I'll enter the best of the two.
*St. Matthew's Episcopal Church, St. Paul, MN. Yay St. Matt's!
Discussion and Plans
I've decided to use two of the branches I've collected lately: an apple tree branch and a branch from a large linden tree that fell last week nearby. As both of these came down during storms, they are not only unseasoned but have more than their share of water inside them.
Unseasoned wood from trees is a great resource for the wood turner but since the wood is soft and wet it can be a challenge to use it. It doesn't cut cleanly when sawing and saw blades have a tendency to get caught in the soft wood. And this is what happened today. I was turning a section from the linden tree to get it roughly shaped and ready for drying and I needed to cut the blank in half (see below). And well, let's go to the photos and do this step by step:
Let's get to work:
The next three photographs are of several large branches that I salvaged on my travels about. They are:
Linden wood

Red oak

And another section of linden wood:


And cut a tenon on both ends for turning later:

And I decided to cut off the bottom and top sections. Since this was a soft piece of wood I thought I would just waltz over to the bandsaw and cut away.

WRONG!!!!
As I was sawing the bandsaw blade got caught in the soft wet wood and stopped moving. And I do mean stopped. It got jammed in the wood and after about 20 minutes of disparate freeing attempts I couldn't get the wood blank off of the bandsaw blade. By now after pounding on the blank with a mallet and trying to pull the blade out of the wood with pliers, the blade was bent and damaged and the blank was still stuck fast.
So then I called Oliver. Oliver is my youngest son and a big strapping lad who is used to his mother's occasional shop outbursts. He graciously agreed to help me get the blade and the blank off the bandsaw. We took a hacksaw and cut the blade in half and gently pulled it and the blank off the bandsaw. Then Ollie finished sawing the blank in half for me with a handsaw while I walked around wringing my hands. And here is a photo of Ollie with the offending section of bandsaw blade:

You can see in the picture how happy he is...
After all this I roughly shaped the apple wood and linden wood blanks and here is a photo of them:
This is linden:

and this is applewood:

Since these are really wet, I'm going to wrap them in paper grocery bags and set them aside to dry slowly and with any luck and the wood fairies ok, we'll have two sets of blanks for shaping and turning.
We will return to this story in late July.
VW
...sigh...
Whenever I begin a blog post like this it's a big tip off that something went astray today...but I'll talk about branch wood first.
We have had a lot of strong storms pass through Minnesota the past week and a number of trees and tree branches have come down as a result. While this has caused headaches for a lot of homeowners and businesses it has been something of a wood-collecting boon for me. I've been driving around and I've collected several large branch sections for use in the shop.
Probably a lot of this wood will become spoons as wet wood is much easier to carve than dried wood is and I made several spoons last week. This week I thought I would use some of the larger branches for boxes, which leads me into my next story.
Amongst the many activities my church parish* engages in is a series of annual art shows that showcase the work of area artists. We get to see original work and the artist gets a chance to make a sale and this is a good thing all around. I was told about the fall show which will have spirituality and art as its theme and I decided to enter. I normally don't enter shows but I think one or two of my tea boxes might stand well amongst other types of art. So I'm going to be making two boxes and I'll enter the best of the two.
*St. Matthew's Episcopal Church, St. Paul, MN. Yay St. Matt's!
Discussion and Plans
I've decided to use two of the branches I've collected lately: an apple tree branch and a branch from a large linden tree that fell last week nearby. As both of these came down during storms, they are not only unseasoned but have more than their share of water inside them.
Unseasoned wood from trees is a great resource for the wood turner but since the wood is soft and wet it can be a challenge to use it. It doesn't cut cleanly when sawing and saw blades have a tendency to get caught in the soft wood. And this is what happened today. I was turning a section from the linden tree to get it roughly shaped and ready for drying and I needed to cut the blank in half (see below). And well, let's go to the photos and do this step by step:
Let's get to work:
The next three photographs are of several large branches that I salvaged on my travels about. They are:
Linden wood

Red oak

And another section of linden wood:

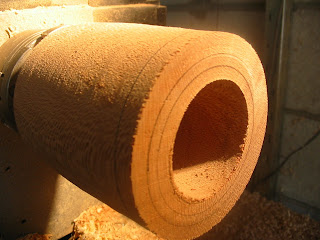
You can see in the above and below photos that I've placed this section of linden branch on the lathe and turned it into a cylinder-shaped blank:

And cut a tenon on both ends for turning later:

And I decided to cut off the bottom and top sections. Since this was a soft piece of wood I thought I would just waltz over to the bandsaw and cut away.

As I was sawing the bandsaw blade got caught in the soft wet wood and stopped moving. And I do mean stopped. It got jammed in the wood and after about 20 minutes of disparate freeing attempts I couldn't get the wood blank off of the bandsaw blade. By now after pounding on the blank with a mallet and trying to pull the blade out of the wood with pliers, the blade was bent and damaged and the blank was still stuck fast.
So then I called Oliver. Oliver is my youngest son and a big strapping lad who is used to his mother's occasional shop outbursts. He graciously agreed to help me get the blade and the blank off the bandsaw. We took a hacksaw and cut the blade in half and gently pulled it and the blank off the bandsaw. Then Ollie finished sawing the blank in half for me with a handsaw while I walked around wringing my hands. And here is a photo of Ollie with the offending section of bandsaw blade:

You can see in the picture how happy he is...
After all this I roughly shaped the apple wood and linden wood blanks and here is a photo of them:
This is linden:

and this is applewood:

Since these are really wet, I'm going to wrap them in paper grocery bags and set them aside to dry slowly and with any luck and the wood fairies ok, we'll have two sets of blanks for shaping and turning.
We will return to this story in late July.
VW
Saturday, June 22, 2013
Small Diameter turnings-needle cases
Hi Everyone,
As most of you know, I've been trying to make a small knitting needle case for a friend of mine, Katie, for a while now. I've tried various woods and equipment and I always go down in flames.
Except for today!
I think I finally have made one that I can give to someone without wincing:
This is a needle case made out of rosewood with two cable knitting needles out of bamboo:


You can see that the rebate is made out of a different wood. I tried to make a case with a top and rebate out of solid wood but I just haven't mastered that as yet.
I used the Nova chuck jaws that I got for my birthday and they were not the right type of jaws for this type of turn. The jaws are made to turn either square turning blanks or tapered blanks. This is a cylinder shape-ed blank and it just didn't turn correctly. Coupled with the fact that the jaws don't quite fit my chuck-they rattle a little and so this caused a wobble when the blank was spinning. Oh well.
I'm going to try a different set up with my lathe and give this another shot.
More later,
VW
Tuesday, June 18, 2013
Turning a Small Box-Discussion, Plans, Photos, and this time I actually got one to work!
Good Morning,
Well, I decided to go down to the wood shop this morning and try out the new jaws for my Nova chuck. I've been wanting to make a small lidded box for a friend of mine, Katie, who loves to knit and is always losing her cable needles. Now cable needles are short, approximately 2" long wooden needles that are used to produce the cable effect in knitted garments like sweaters. I made her some cable needles earlier this year but she really needs a small box to keep them in as they are small and easily lost.
Discussion and Plans
I've got some small pieces of rosewood in the shop that I thought would work well. I think this type of small turning requires a very dense and fine grained hardwood. There is a lot of small detail which has to be turned into the wood in order for the box and top to fit together tightly enough so the top doesn't slip off. So rosewood it is. The box also has to be long enough to accommodate 2" long needles and the inside diameter has to be large enough to hold at least 2 needles.
So here we go:
Here is a photo of the rosewood block. It's really short as it's a pen blank. I've marked off the ends with a white pencil and I won't turn beyond those lines as this will give me a square end to mount in the jaws in a few minutes:

These next two photos show the jaws on the Nova chuck and mounted on the lathe. The long spigots will hold the square end of the rosewood blank:


And here is the whole thing ready to go:

As this is a spindle type turning, I've mounted the blank between centers and I'm going to use my spindle gouge to rough this into a round cylinder shape:

In this photo you can see the blank. It's been turned and a tenon has been tuned into as well. The tenon will remain a part of the box end and I'll cut off the top:

And here are the parts of the box. They've been separated:

Next-I've mounted the top of the box onto the lathe and hollowed out the interior. This matches precisely the diameter of the tenon on the box portion. I hand turned this and sanded smooth:

It fits!!!!

I've taken the box portion and mounted that on the lathe and started to bore out the center with a 1/2" twist drill. I began the boring portion with a small Forstner bit but it clogged up with chips about a 1/4" inside. You can see how the chips were beginning to pack up on the twist bit too. I had to dig this out with the sharp end of a wood screw:

But eventually I got it drilled down to a depth of about 2". The top and bottom fit together very well:

Well, what a nerve wracking thing this is to make! I'm going to keep this one as I don't think two needles will fit inside of it yet. Next time I'll try a longer blank as that will stay clamped inside of the jaws more securely that the short ends I used. And I'll make the whole thing longer. Lastly I will wait to true up the sides of the top and bottom until the very end and then I'll remove the waste wood and sand the ends smooth.
I'm going to give this another shot tomorrow.
VW
Well, I decided to go down to the wood shop this morning and try out the new jaws for my Nova chuck. I've been wanting to make a small lidded box for a friend of mine, Katie, who loves to knit and is always losing her cable needles. Now cable needles are short, approximately 2" long wooden needles that are used to produce the cable effect in knitted garments like sweaters. I made her some cable needles earlier this year but she really needs a small box to keep them in as they are small and easily lost.
Discussion and Plans
I've got some small pieces of rosewood in the shop that I thought would work well. I think this type of small turning requires a very dense and fine grained hardwood. There is a lot of small detail which has to be turned into the wood in order for the box and top to fit together tightly enough so the top doesn't slip off. So rosewood it is. The box also has to be long enough to accommodate 2" long needles and the inside diameter has to be large enough to hold at least 2 needles.
So here we go:
Here is a photo of the rosewood block. It's really short as it's a pen blank. I've marked off the ends with a white pencil and I won't turn beyond those lines as this will give me a square end to mount in the jaws in a few minutes:

These next two photos show the jaws on the Nova chuck and mounted on the lathe. The long spigots will hold the square end of the rosewood blank:


And here is the whole thing ready to go:

As this is a spindle type turning, I've mounted the blank between centers and I'm going to use my spindle gouge to rough this into a round cylinder shape:


And here are the parts of the box. They've been separated:

Next-I've mounted the top of the box onto the lathe and hollowed out the interior. This matches precisely the diameter of the tenon on the box portion. I hand turned this and sanded smooth:

It fits!!!!

I've taken the box portion and mounted that on the lathe and started to bore out the center with a 1/2" twist drill. I began the boring portion with a small Forstner bit but it clogged up with chips about a 1/4" inside. You can see how the chips were beginning to pack up on the twist bit too. I had to dig this out with the sharp end of a wood screw:

But eventually I got it drilled down to a depth of about 2". The top and bottom fit together very well:

Well, what a nerve wracking thing this is to make! I'm going to keep this one as I don't think two needles will fit inside of it yet. Next time I'll try a longer blank as that will stay clamped inside of the jaws more securely that the short ends I used. And I'll make the whole thing longer. Lastly I will wait to true up the sides of the top and bottom until the very end and then I'll remove the waste wood and sand the ends smooth.
I'm going to give this another shot tomorrow.
VW
Monday, June 17, 2013
Leon's Tea Box Part 5-Completion and new set of Nova chuck jaws!
Hi Everyone,
I put another layer of lacquer on the tea box this weekend for a total of three layers and let it dry out yesterday until this morning. I took a look at it and decided to place it on the lathe one last time to polish it and here is what it looks like:


The outer lid has begun sticking a bit so I've brought the whole thing inside and I'm going to leave it disassembled for a few days to see if the wood shrinks a little. It has been very humid here in the Midwest the past several days and the wood may have distorted a little in response to the ambient moisture in the air. This is going to eventually live in Southern California where it is drier and warmer and it's possible the lid might dry out and shrink a little and loosen up. So we'll see where this goes.
I'm satisfied with the piece overall and I don't plan on doing anything more to it so we'll stick a fork in it and call it done. I'll mail it at weeks end.
______________________________
And, I got myself a birthday present: pen jaws for my Nova chuck! Those of you who have been reading the blog for a while will remember my past attempts at turning needle cases for yarn needles several years ago. Well, to make a long story short, I failed miserably at it because at the time I couldn't drill a hole accurately down the center of long blocks of wood. With these jaws I'll be able to drill a hole exactly in the center of small diameter blocks of wood. I'm very jazzed as you might guess and I'll do a turning later this week.
Oh Boy!


See you later this week,
VW
Saturday, June 15, 2013
Валентина Терешкова
Сегодня 50-летие первой женщиной, летать в космосе. Большая работа Валентины Терешковой!
http://en.wikipedia.org/wiki/Valentina_Tereshkova
Надеюсь, что она хорошо и все в порядке!
Leon's Tea Box-Part 4: Applying the Finish
Hi Everyone,
Well, I'm feeling more rested than I did last night so it's time to bring this project to a conclusion.
Finishing
I think that choice of finishes should first of all be based on the eventual use of the item. As I make primarily kitchen ware, finishes have to be durable and food safe. I used to use a lot of oil and beeswax which is pretty and easy to apply but it washes off easily and doesn't protect the item particularly well. So I've stopped using that type of finish. I have begun using more salad bowl varnishes, which are food safe after they have cured. This is durable and protects the item. A good way to go.
As this project will be used for holding loose tea and not for making or serving food, durability is not quite as critical a factor. So my second criteria for a finish is appearance. I want something that will enhance the color and grain patterns in the wood. My third and last criteria revolves around the hardness of the wood. Soft woods like evergreens-pines, douglas fir, poplar, and silky oak in our case-really don't do well with oils. The wood is soft and it tends to absorb oil and soften the surface. This makes it look muddied. In this case we need a finish that sits on top of the wood and adheres well to it.
So my selection for this is lacquer. It has a number of good qualities-it can really make the color and grain in wood pop. It is also very easy to apply as it comes in a spray can (there are brush on lacquers you can purchase if you prefer this). It dries rapidly so multiple layers can be applied in a short period of time. And it polishes beautifully. So lacquer it is.
Here we go:
First I took the tea box and put all of the parts back on the lathe for a final sanding with 400 grit paper:

And then I got out the secret weapon: old, soft, nylon scrub pads. The kind you wash dishes with. This will clean off any fuzziness on the surface of the wood without damaging it or cutting into it like sandpaper:

And then I began spraying the ends of the box parts. The wood here is the end grain and end grain soaks up finishes like a sponge. These areas will need at least 2-3 coats of lacquer:

I'm going to let these harden for about an hour and then go down and spray the sides of the box parts several times and then let them dry for several more hours. Late this afternoon, I'll put everything back on the lathe one last time and turn it on as fast as is safe and polish the the surfaces with the nylon pads and polish them with a hard wax. I use parrafin for this last step.
Come back later today and I'll post the finish photographs.
VW
Friday, June 14, 2013
Leon's Tea Box Part 3-Creation of the inner lid and completion
Hi Again,
Here is the box portion remounted on the lathe. This box will have an inner lid so it needs a lip created inside of the box for the inner lid to sit on and you can see it just inside the box. And this is another critical area: there needs to be just enough wood for the lid to sit on and the inner sides of the rim have to be parallel with the outside of the rim. Other wise the lid won't fit properly or it will fall into the box:

Ok, we're on the home stretch. I've taken the blank for the inner lid and mounted it on the lathe. It's going to need to have the face trued up and the diameter of the lid shaped to match the inside of the box exactly:

This photo was taken several minutes later. It fits perfectly:

Now I needed to hollow out the underside of the lid so I can re-mount it on the lathe and that's what I've done in this photo. In the photograph you can see 4 concentric circles. Those circles represent the women in Leon's life: his wife and his three daughters:

I've turned over the lid and now I'm ready to shape the top of it. It took about 30 minutes of careful turning to get the lid to fit properly underneath the outer lid:

And here are the results. This is the completed, assembled tea box:

This is the box with the outer lid off and the inner lid in place:

And here it is completely disassembled. You can see the inner lid in the left lower corner of the photograph:

And this turn is completed.
I'm really tired and so I'm going to put the finish on it tomorrow and I'll send photos and discussion of this part of the project tomorrow.
Well, my back is killing me and I've been clobbered by mosquitoes so I'm going to go and have some chocolate milk and sit down with the cats.
See you tomorrow.
VW
Well, the wood fairies must be smiling today because absolutely nothing has gone wrong with this project. So let's sail on and complete this turn.
Here is the box portion remounted on the lathe. This box will have an inner lid so it needs a lip created inside of the box for the inner lid to sit on and you can see it just inside the box. And this is another critical area: there needs to be just enough wood for the lid to sit on and the inner sides of the rim have to be parallel with the outside of the rim. Other wise the lid won't fit properly or it will fall into the box:

Ok, we're on the home stretch. I've taken the blank for the inner lid and mounted it on the lathe. It's going to need to have the face trued up and the diameter of the lid shaped to match the inside of the box exactly:

This photo was taken several minutes later. It fits perfectly:

Now I needed to hollow out the underside of the lid so I can re-mount it on the lathe and that's what I've done in this photo. In the photograph you can see 4 concentric circles. Those circles represent the women in Leon's life: his wife and his three daughters:

I've turned over the lid and now I'm ready to shape the top of it. It took about 30 minutes of careful turning to get the lid to fit properly underneath the outer lid:

And here are the results. This is the completed, assembled tea box:

This is the box with the outer lid off and the inner lid in place:

And here it is completely disassembled. You can see the inner lid in the left lower corner of the photograph:

And this turn is completed.
I'm really tired and so I'm going to put the finish on it tomorrow and I'll send photos and discussion of this part of the project tomorrow.
Well, my back is killing me and I've been clobbered by mosquitoes so I'm going to go and have some chocolate milk and sit down with the cats.
See you tomorrow.
VW
Leon's Tea Box Part 2: Completion of the outer lid
Hi Everyone,
Ok, I'm back.
Here is the box with the lid on the lathe. I'm getting ready to finish the top of the lid:

Now I've taken away the tailstock and I'm going to turn the top. I have the beginning of a knob on the top. This is an important step as the box doesn't have a lot of detail so the lid is the only area that will have some detail to it. I wanted to give the box a Japanese-like formality so there isn't a lot of detail. Instead the box will stand on it's shape, the shape of the lid, and the figure in the wood itself:

Here is the lid several minutes later:

And here is the completed lid. It has been sanded and smoothed and it's ready for a finish:

These next two photos show the lid by itself:


The tea box is about 3/4 finished at this point.
Let's go to the next posting and you'll see how it came out.
VW
Leon's Tea Box-Part 1: Turning the outer lid and the sides of the box
Hi Everyone,
I was in the shop this afternoon looking at the silky oak pieces that have been drying in preparation for the tea box I am planning to make for my cousin's husband Leon, and I decided that the wood was dry and stable and so it was time to begin the turn.
Here are the photos and discussion for the outer lid:
Here are the basic pieces of wood for the box. They consist of the box, an inner lid, and an outer lid. I've been nervously drying this out in the shop as this is a critical step. The box parts are going to have to fit precisely so if there is the slightest bit of moisture still left in the wood and it dries out after I've shaped the pieces, the parts won't fit and I won't be able to put them back on the lathe for adjustment.
I've been drying these pieces in the shop for weeks now and they feel light enough and they haven't distorted so I think now is the time to go:

This is the outer lid in it's rough cut state:

Here is the lid on the lathe. I'm going to hollow out the underside of the lid and true up the face of the blank:

Here is the blank after the face has been flattened. Time to hollow it out. The pencil lines indicate the thickness of the walls of the lid, which is 7mm thick:

Hollowing only took a few minutes as this wood is soft and the blank itself is small in diameter. One thing that was important was the rim of the lid. The inside walls of the lid have to be parallel with the outside walls so it will fit properly over the box. After I finished hollowing it out, I sanded it with a sanding mop. These are nifty gadgets that enable you to sand an irregular surface:

This is the finished underside of the lid:

Next, I took the lid off the lathe and attached the box and got it ready to turn. The pencil lines on the side of the box and the first line on the edge denote where I am going to remove wood so that the outer lid will fit flush with the box portion of the tea box:
In this photo you can see how the rim is being created. This is another critical step as the lid has to fit very snuggly so I can use the box to turn the top and sides of the outer lid (you'll see what I mean shortly):

And here is the finished box:

Now I've fitted the top on the box. They fit very tightly for this next step which it the shaping of the sides and the top of the lid:

Here I've placed the box and lid between centers for turning:

And here are the sides of the box. You can see they match up:

And here is a photo of the outer box having been shaped, and sanded. It's ready for a finish, which we'll do later:

I'm unable to add more photographs to this posting so I'll end this and start another and show you how the turn was finished.
VW
I was in the shop this afternoon looking at the silky oak pieces that have been drying in preparation for the tea box I am planning to make for my cousin's husband Leon, and I decided that the wood was dry and stable and so it was time to begin the turn.
Here are the photos and discussion for the outer lid:
Here are the basic pieces of wood for the box. They consist of the box, an inner lid, and an outer lid. I've been nervously drying this out in the shop as this is a critical step. The box parts are going to have to fit precisely so if there is the slightest bit of moisture still left in the wood and it dries out after I've shaped the pieces, the parts won't fit and I won't be able to put them back on the lathe for adjustment.
I've been drying these pieces in the shop for weeks now and they feel light enough and they haven't distorted so I think now is the time to go:

This is the outer lid in it's rough cut state:


Here is the blank after the face has been flattened. Time to hollow it out. The pencil lines indicate the thickness of the walls of the lid, which is 7mm thick:

Hollowing only took a few minutes as this wood is soft and the blank itself is small in diameter. One thing that was important was the rim of the lid. The inside walls of the lid have to be parallel with the outside walls so it will fit properly over the box. After I finished hollowing it out, I sanded it with a sanding mop. These are nifty gadgets that enable you to sand an irregular surface:

This is the finished underside of the lid:

Next, I took the lid off the lathe and attached the box and got it ready to turn. The pencil lines on the side of the box and the first line on the edge denote where I am going to remove wood so that the outer lid will fit flush with the box portion of the tea box:

In this photo you can see how the rim is being created. This is another critical step as the lid has to fit very snuggly so I can use the box to turn the top and sides of the outer lid (you'll see what I mean shortly):

And here is the finished box:

Now I've fitted the top on the box. They fit very tightly for this next step which it the shaping of the sides and the top of the lid:

Here I've placed the box and lid between centers for turning:

And here are the sides of the box. You can see they match up:


I'm unable to add more photographs to this posting so I'll end this and start another and show you how the turn was finished.
VW
Subscribe to:
Posts (Atom)