Saturday, March 22, 2014

Project Completions: The Music Box and the Keepsake Box. And a SWW first-a video of the music box!!!

Hi Everyone,

Well, everything is finished and here are the finish photographs and comments:

The Music Box

I finished the music box finish yesterday. It wound up needing 5 coats of polyurethane to give it a good, solid finish. I buffed it and waxed it and it was done. It has a beautiful satin finish to it:


The last thing I needed to do then was to install the mechanism. This is a photo of the top of the box. You can see the shelf that the mechanism sits on with the hole for the key:


This is the position of the music box mechanism. I've placed it this way so the key will be in the center of the box:

I marked four tiny holes for drilling:


And I drilled the holes with a drill press:


My husband lent me his micro screwdriver set to screw the tiny screws in with:


And viola! It's firmly in place:

And here is a video clip of the music box playing it's tune, Teddy Bear Picnic!!!


The Keepsake Box

The keepsake box came out beautifully as well. There really is nothing like turning fine grained hard woods. They turn cleanly and finish perfectly. Here are the photos for this:

In contrast to the basswood box above, this took only one coat of polyurethane with a complete curing of the finish for several days and then I buffed this too: 


It's been absolutely a banner day today. Very happy with the results.

My next project is using up some of the big pile of scrap wood I seem to have accumulated over the past several months. I'll cogitate on that over the weekend and get back to you early next week.

Triumph!!!

VW

Wednesday, March 19, 2014

Keepsake Box out of Brazilian Cherry-this turn is finished

Good Morning All,

Well, it snowed again last night! Honestly, I don't think spring is going to arrive until August:

The patch of green grass under the cherry tree is gone:


And this is a wooded area nearby:


Even though spring hasn't arrived, I did have a good morning in the wood shop and I've just about finished the keepsake box. Here are today's photos:

I took the box back down to the wood shop and gave the top and lid their final sandings to 400 grit. Here is a photo of the box attached to the lathe:


Next, I reverse chucked the bottom and I'm getting reading to remove the waste wood with a thin-bladed parting tool:

This is the parting tool I use. I bought this on impulse (something I never do) but I haven't regretted purchasing as it is a very strong tool and it parts off waste wood very easily and swiftly. No turning shop should be without one:


And here is the box with the waste wood having been removed:

I then took a roughing gouge (affectionately named Bob after the father of a friend of mine) and shaved the bottom until it was smooth. Then I took a 1/4" bowl gouge and gently created a concave surface so the box will sit squarely on it's bottom edge and not spin or rock on flat surfaces:


And here is the box with the lid. The turning portion of this project is complete:


I've taken the box upstairs to be varnished and I'm photographing it with a tangerine for size comparison:

And here it is with a coat of wipe on polyurethane. I'll give it one more coat after this dries and then I'll let it dry and buff it:

I think we can stick a fork in this one and call it done!

Well, with the completion of these last two projects it's time to clean out the wood shop and get it organized for spring turning. So stay tuned and drop by the wood shop. There's always a new adventure ahead!

See you soon,
VW


Tuesday, March 18, 2014

Music Box Project, continued:Part 3: Sanding and Applying the finish

Hi Again,

This was a busy day--I've taken the box back down to the wood shop and completely sanded it and then I brought it inside and applied a preliminary coat of varnish to the inside and outside of the box.

Here are a couple of photos:

I'm applying a wipe on polyurethane to the box and the lid, both inside and out. This wood is really, really porous and it soaked up the poly in no time flat. This will take a number of coats of varnish to completely finish it:


I will apply at least 3 more layers of varnish and then stop for a few days and let the finish cure and then I'll wax it and polish it. After that's done, I'll install the mechanism. I'll display the finish photos this weekend.

Tomorrow I"m going to finish the keepsake box so stay tuned for that.

See you soon,
VW

Music Box Project, continued:Part 2: Installing the music box mechanism-It Worked!!

Ok, I'm back and as you probably guessed the turn was successful but in an unexpected way. Here are the photos:

I went down to the wood shop and made some precise calculations and decided that the existing shelf was about 1 1/2" thick, which surprised me as the shelf didn't feel that thick. But being the meathead that I am at times, I decided this was correct and to plan the turn around that measurement. I placed the box back on the lathe and proceeded to drill a 1" x 1/2" hole in the center of the shelf. That would help to establish the depth of turn so I wouldn't remove to much wood:


Here is the hole in the center:


And I took a 1/4" bowl gouge and proceeded to very gently shave away at the shelf until the level of the shelf matched the depth of the hole in the center:

That part of the turn went well. So I decided to repeat that method and drill another 1/2" deep hole and then the resulting shelf would be about 1/2". So I drilled the hole...

...and horror of horrors, I drilled through the shelf unintentionally-Gaahhh! I miscalculated the thickness of the shelf by a full 1/2". After I caught my breath, I looked carefully at the shelf. It was about 1/2" in thickness and the good news was is it was thick enough and strong enough to support the mechanism:

I thinned down the shelf by about 1/8" of an inch more and then I took it off the lathe and dropped the mechanism inside and the key fit inside the hole perfectly:

Here you can see the key protruding out of the bottom:

And here is the music box mechanism inside the top of the box:


Talk about dumb luck!! I thought this was going to take all afternoon. I've been dreading this part of the turn since I began the project! It took all of 5 minutes to do!

The turning portion of this project is now done. All I have left to do is the final sanding and applying the finish.

I need to run out and purchase some small wood turning screws for the box. I'll probably post again later today after I've applied a preliminary layer of varnish to the box.

I like to think it was my immense skill as a wood turner that saved the day but it was probably the wood fairies who made this possible.

More later,
VW


Music Box Project, continued:Part I: Installing the music box mechanism-considerations and photos

Hi Everyone,

The music box mechanism arrived in the mail yesterday and it plays Teddy Bear Picnic perfectly so our next step is to install it in the box. Here are photos of the mechanism:


Here is a closeup shot:


To do that I will need to finish the interior shelf I created last week for it to sit on.

There is a possible problem here: the shelf will need to be thin, about 1/4" so the key to the mechanism will protrude through enough so it can be wound from underneath the music box. I am concerned about the strength of the shelf. This is both soft wood and the shelf consists of end grain fibers and I'm not sure if this will be strong enough to support the box and to resist cracking over time after it's been wound time and again. In addition to this I'll need to drill about a 3/4" wide hole in the shelf for the key to protrude through and this will weaken the shelf further.

If the resulting shelf is too thin to support the mechanism then plan B is this: I'll cut away the shelf entirely and leave a short ledge along the edge of the interior wall of the box. I'll then create a stronger shelf out of hardwood and install that into the box instead.

Here is an example of a thin piece of hardwood. This is some scrap walnut leftover from a past project:


The shelf at present is about 1" thick and I'll need to remove about 3/4" of that thickness. I'm going to go down to the wood shop and measure it carefully and then remove the waste wood from the shelf.

I'' be posting more photos today so be sure and drop by in a couple of hours to see what happened.

More later,
VW

Monday, March 17, 2014

Brazilian cherry keepsake box continued-turning the lid

Hi Everyone,

Well, last week's spring thaw was rather short lived-we got a mix of snow and ice this morning and it feels colder than the 40 degree reading on my thermometer at the moment. But a lot of the snow has melted and we can actually see grass. There may be hope after all:


Burrr. Time to get back to work.

Turning the Lid

Last week after my last blog posting I took the bottom of the box down stairs and I deepened by about 1 1/4". It really needed that and so with that part of the turn completed, it's time to begin the lid. Here is a photo of the box and the turning blank for the lid:


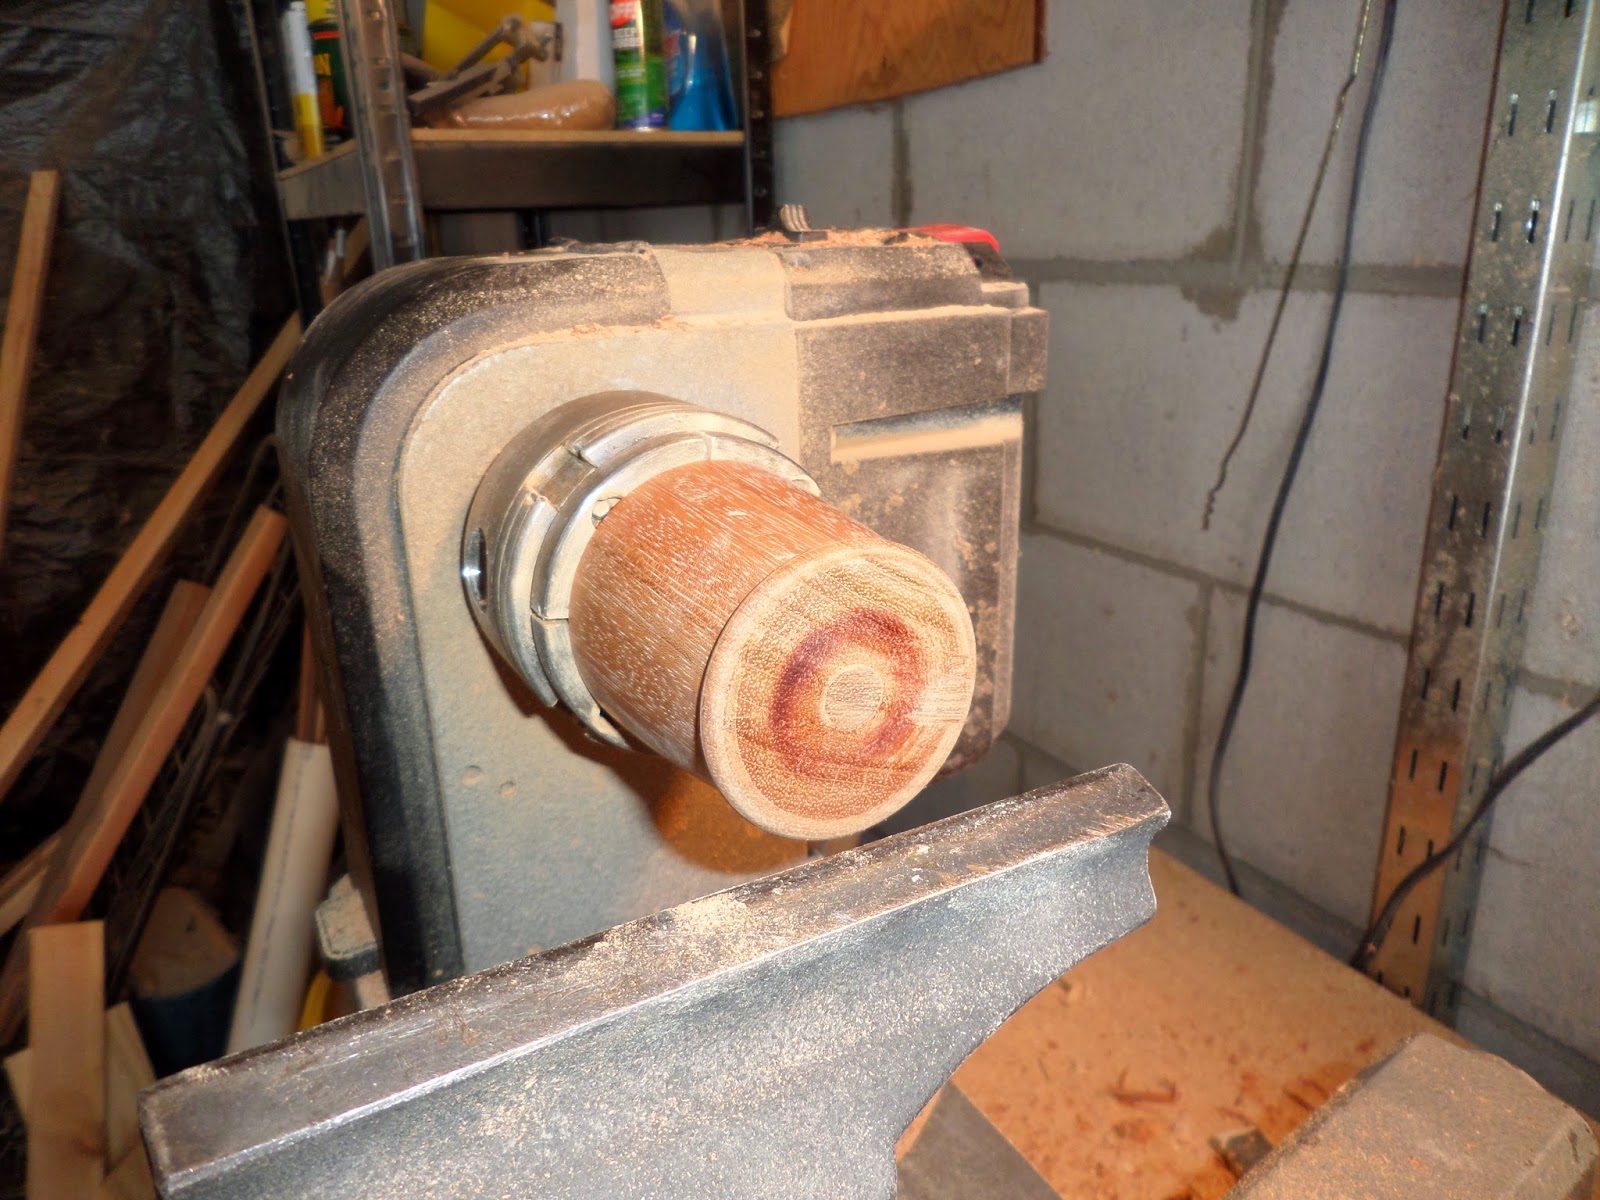
I mounted it on the chuck and the first thing I did was to true up the face:


Next I marked off the underside of the lid. By removing the wood between the lines in the photograph, I'll be able to cut out the tenon which will fit inside the box and hold the lid in place:


This has to fit snugly in the box and so I generally turn this part of a lid very slowly and mm by mm. Here is a photo of the side of the blank at present:


Lastly I sanded the underside of the lid and turned a small decorative design into the underside. This portion of the lid is now complete and the total time for this was about 15 minutes:

Next I flipped the blank over and placed it between centers again to begin shaping the outside of the lid. This will help to hold it securely in place while I remove a lot of wood:


Here you can see it beginning to take shape:


My original intent was to create a Raffan-style box. Raffan boxes are named after Richard Raffen, the well known Australian wood turner who popularized this design. The tops are generally rounded over with a cone-shaped finial and the boxes are cone shaped as well, with the bottom being narrower than the top. In this photograph you can see the finial beginning to take shape:


Now I was going to turn a bead on the bottom edge of the lid but I don't think I'm going to have enough wood to do that with so I'll have to skip the bead and simply round off the bottom:


 Nope, no bead on this one:


And so I turned off the bead. Here is the lid. It really needs to be flattened and rounded off more so I put it back on the lathe and proceeded to do just that:


Here is the lid after several minutes of turning. I added a base to the finial to avoid turning a long finial which I don't think would have looked very good:


And here it is after flattening the top. I could make the finial smaller but I think the box is large enough that the larger combined finial-base structure looks fine:


I also turned a small depression into the top of the finial and added a small cone inside. This replicated the cone shape of the finial and is a nice design element:


And here it is at present. I'm satisfied with the over all shape and design and so this part of the turn is completed. Next I'll be taking it back down to the wood shop for a thorough sanding and then I'll think about the finish.

Stay tuned,
VW