Wednesday, July 24, 2024

The Hickory Serving Platter, continued-finishing and finish photos

 Hi Everyone,

Well, it's done! The finish sanding went a lot faster than I thought it would but it's sanded to 400 grit and I decided to stop at that.

After yesterday's session, there was still a lot of visible scratches in the surface and sanding it with 80 grit paper didn't really do much for it. The turning was done and I didn't want to use the turning tools to remove anymore wood but it became obvious that this was necessary or it would take a month of sanding to get it where I wanted it to be. So I got out by turning scrapers and very gently turned the surface until it was smooth.
It's been a while since I've done any turning and my hands are developing arthritis so I really didn't think I was going to be able to finish this but the wood fairies helped out and I was able to get it done.
I applied a very thin coat of polyurethane on it and then I removed it from the lathe for photo purposes. It's sitting on the coffee table in my living room.

Here's the finish photos:

This is the platter from different angles:


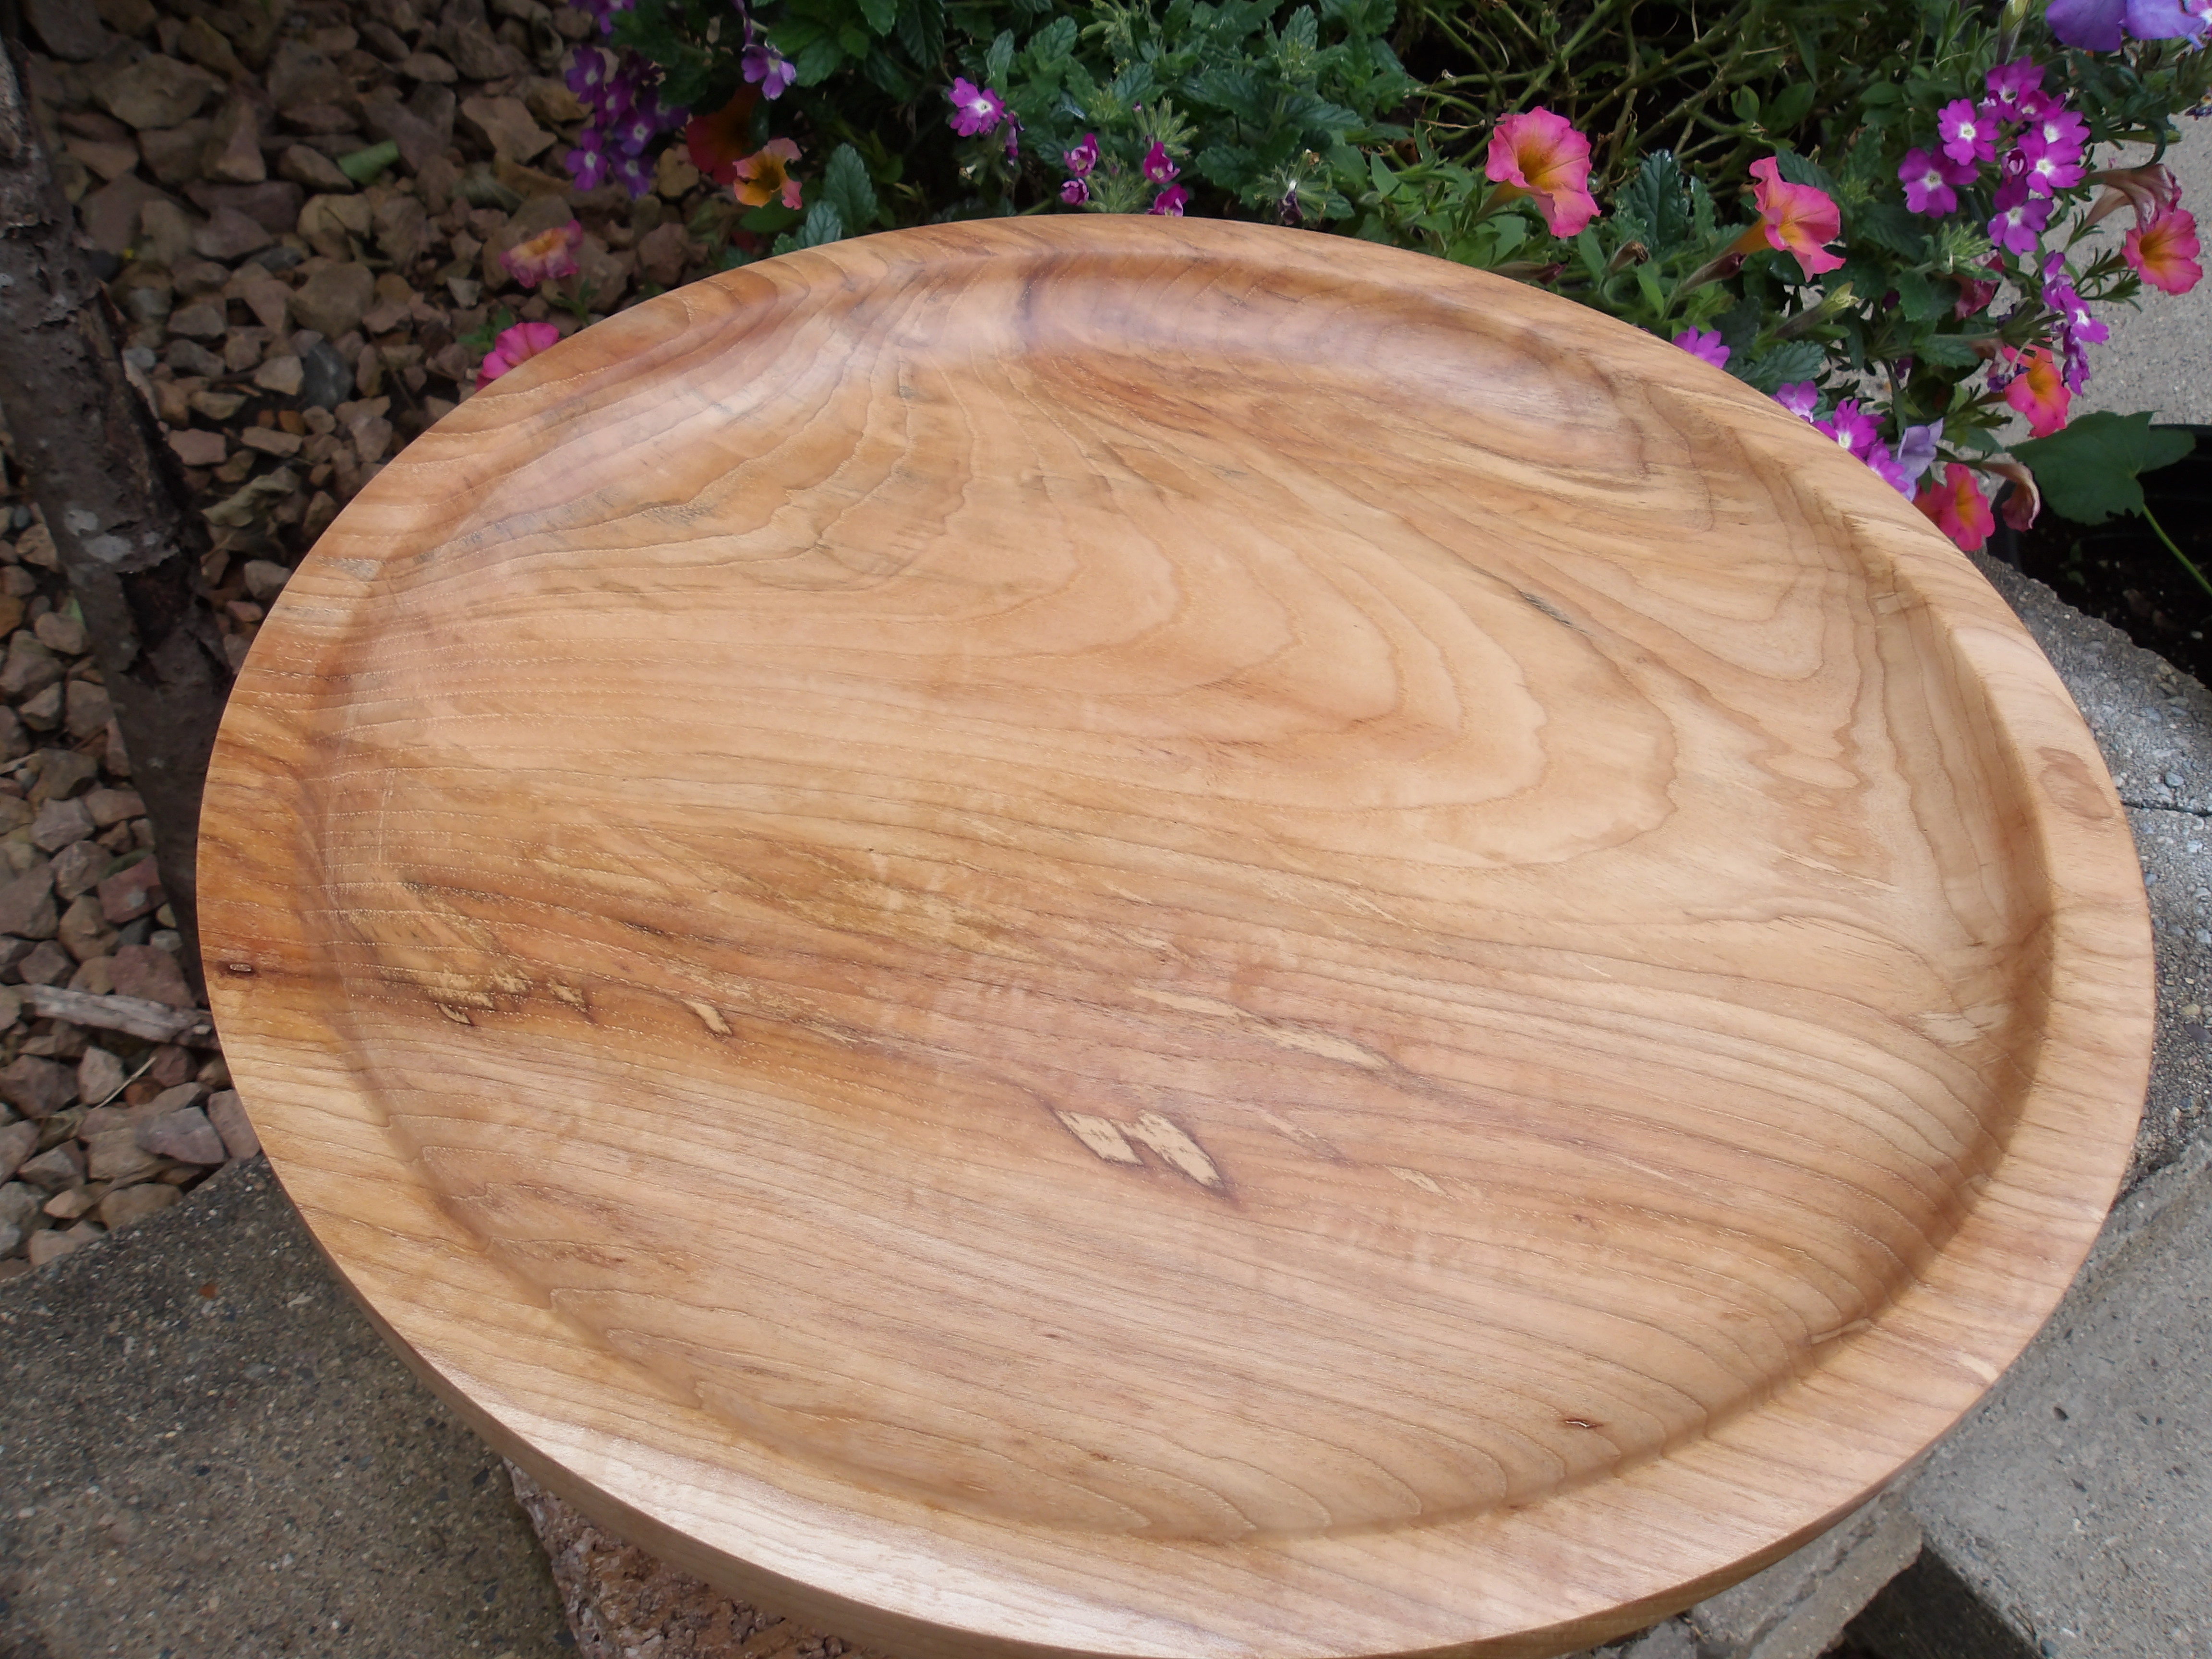
And here it is on my coffee table:


It's heavy and very stable an I'm happy with it's appearance. I think this one merits a signature tomorrow.

_____________________


Ok, what's next-I have several projects in line. The first one is a remodel of the main bathroom in my home. That will be happening next week. And the shop needs to be cleaned out and re-organized as it's a mess. Lastly my bandsaw needs maintenance and cleaning as it's making a funny sound. 

And as I have some large turning blanks, I'll be up to something on the lathe very soon.

Thanks for dropping by-see you all soon.

VW

Tuesday, July 23, 2024

The Hickory Serving Platter project continued-hollowing out and sanding

 Hi Everyone,

After several days out of the wood shop, I'm back and I've hollowed out the platter. As this is a wide platter turning the bottom flat was a challenge and I'm still working on the rim but I'm moving forward.

Let's see today's photos:

Here's where I left off. The center is still in place and the platter is very shallow at this point. And if you look closely you can see the screw holes from the faceplate:


The platter is a little deeper and the center is gone but you can see ridges from the turn:


Here's the platter nearly at depth. It took a lot of careful fine turning to eliminate the hills and valleys in the surface. And as it's hickory, it's very hard and a more of a challenge.  There are scratches and rough patches in the wood but it's going to be lovely when it's done:

Here is the platter completely hollowed out. It doesn't look too deep but it's nearly an inch and a quarter deep. It also has a lot of scratches in the wood:


In this photo you can really see the scratching in the wood:


I have to stop now and go and make dinner. Tomorrow I plan to spend the entire day smoothing down and eliminating all the scratching. By the time I'm done it will be ready for a coat of polyurethane.


See you all tomorrow.
VW


Friday, July 19, 2024

Hickory Serving Platter project, continued-removing broken screws

 Hi Everyone,

Well, so far the project is going well. I've finished the underside of the platter and it looks fine.

Let's look at some photos:

Here's the underside of the platter. I sanded it to 400 grit by hand and surprisingly it didn't take long to get looking really nice. Then I polished the bare wood with a worn nylon scrub pad and applied a thin coat of poly to the surface:


Now here is a photo of the top of the platter before I evened up the surface. You can see the grain pattern on the surface:


Now when I removed the faceplate, a problem arose-two of the screws holding the faceplate to the wood broke off. Not the best thing in the world to happen but that can be dealt with. In the photo you can see two red concentric circles. The broken screw shanks are located with in those two line. And I have the screw holes circled in red too. What I did was begin the hollowing out process right up to that outer red circle and then turned away a section about 3/4" deep and then proceeded to dig out the retained screws:


Here's a clearer photo:


Here is a photo of one of the screws. I dug it out with an old, beat up wood chisel: 


Here's the screw shank or what's left of it:


And here is the platter after I removed the screws and turned the whole thing a little bit deeper:


The platter has a lot of wood still to turn away but I think that part of the turn will go well and quickly too. So I'm going to be working on this tomorrow and off and on this weekend.

I'll be back later this weekend with more photos.
VW


Wednesday, July 17, 2024

Hickory serving platter project

 Hello Again,

Ok, here's a new project-a hickory serving platter. 

Unfortunately the purple heart bowl won't be this summer's project but I do have an equally challenging project to do-turning a large serving platter out of American hickory.

Discussion

A couple of years ago I purchased a large tranche of lumber from my friends at Forest Products Supply and among the pieces was a wide cutoff piece of hickory from a tree slab. It's about 2 inches thick, square in shape, and about 18 inches wide. From that I cut out a circular turning blank about sixteen inches in diameter and that's is what is mounted on the lathe right now. 

Plans

I've mounted the blank on a six inch diameter turning plate. Since my bandsaw is out of order at the moment, we cut off the corners, and I've turned it into a circle. When the underside is done, I'll flip it over, hollow it out and finish it with salad bowl finish so it can be used for serving food.

Let's take a look at some of today's photos:

This will be the top of the platter eventually and the bottom photo will be the underside. If you look carefully at the bottom you can see how we nipped off corners to round off the shape a little. This also shows the grain pattern, which is really pretty:


Here in this photo you can see that I've flattened the edge and the underside of the blank. In the center is a large, round mortise that vice will fit into when it's time to turn the blank over and mount it on the lathe: 


Here you can see the markings for the foot of the bowl, the mortise, and the underside of the edge which will be removed so someone can slide their fingers underneath and easily pick up the platter:


And here is the underside of the platter after about an hour's work. The foot of the platter and the mortise are very clear in the photo and the underside of the edge is gone too. 

I'm not sure if I'm going to do anymore turning on this side of the platter so I'm going to stop and look at it a bit before proceeding. 
I'm going to need to get some more sanding discs tomorrow to smooth the surface. Once that's done, I'll give it a coat of General Finishes Salad Bowl finish and then it will be time to flip it over and work on the top:


Ok, my hands are hurting so I'll stop here. See you tomorrow.

VW

The Purple Heart Bowl Project, postponed

 Hi Everyone,

I ran into some technical issued with the purple heart turning blank and so I am postponing this project until later this year or possibly next spring. 

I have decided to move ahead however with a large, kiln dried piece of hickory lumber and I'll do this project in a separate blog.

See the next posting.

VW

Sunday, July 7, 2024

The Purple Heart Bowl, continued

 Hi Everyone,

Well I had the surgery on my hand and it's feeling fine so I decided it was time to go outside and do some turning. Here we go:

Since this is a large, wide, and very heavy turning blank it merits a large faceplate. This one is from One Way faceplates, it's cast iron, and it weighs 8 pounds and has lots of screw holes. I decided to use the outer row of screw holes to minimize any wobbling of the blank as it spins. It's also mounted on what will be the top of the bowl and this is so I can turn the underside of the bowl first:

Now since my hand is getting a little painful, I'm going to stop and tomorrow I'll get some help mounting this on the lathe.

See you tomorrow.
VW


Tuesday, June 25, 2024

The Purple Heart Bowl project

 Hello All,

Well, this summer is turning into a very busy time. I'm working on a bathroom remodel, painting the interior of my home, and starting up my art and woodworking activities again. And I have a very special project to do: a large wooden bowl out of solid purple heart.

Here's the background:
My internist is retiring. She has been taking care of me and my husband for over 20 years now and after many years of medical practice is moving on. Her last day is August 4.

I've known about her upcoming retirement for a while and I've planning this project for several months. I considered another laminated bowl, and you've seen me make those in past postings, but I decided on a bowl blank out of solid wood. And I got lucky-I found a solid, kiln-dried bowl blank out of purple heart so that's what the bowl will be made out of.*

Plans:
This is a huge bowl blank-it's17" wide x 3" thick and it's pretty heavy. It's kiln-dried and came coated in wax, including the edges. So cracks or splitting and ready to go. I'm going to turn a shallow, wide bowl, and finish it with General Finishes salad bowl varnish so she can use it for serving food. And I'm going to sand the daylights out of the surface.

Here are a couple of preliminary photos to start with:

You can see this has great color and no sap wood: 


After examining it, I located the center of the block so as to get the faceplate centered: 


And I got the lathe ready to go:


And given that the blank is so wide, I'm going to use my largest faceplate for this: 


And this is what it's going to look like when I screw it down tomorrow: 

I'll check all my turning chisels tomorrow and fix anything that needs fixing. The first step will be mounting this on the lathe and even up the sides and face of the blank.

Ok, I'm back in the saddle again. Let's get going!

Stay tuned,
VW

*The wood blank came from Got Wood at https://www.turningblanks.net/collections/kiln-dried-woods


Sunday, June 9, 2024

Coat Hook Rack-finish photos

 Hi Everyone,

I've finally gotten some spare time today after a very busy week to finish the coat hook racks. Here's the photos and explanation:

The construction of the rack is pretty simple and finishing it was as well. I used General Finishes gel finish in Candlelight and it looks good. It's gives the pine a rustic look. I used a clear spray finish over the stain, and I used some very simple metal coat hooks from the local big box store:


And that was it.

The rack is long enough to mount through the sheet rock and into the wooden studs underneath. The studs here locally are 18" apart. As the racks are 51 inches long, there is enough room for several screws. 

I think we can stick a fork in it and call it done.

________________________________

The next project is a very simple coffee cup cabinet with narrow shelves for my daughter-in-laws pottery cups and I'll show that one to you too.

After this come the first turning project of the year-a fruit bowl made on the lathe.

See you all soon,
VW

Tuesday, May 28, 2024

Coat Hook Rack Project, continued

 Hello All,

I finished building the coat racks and I sanded them smooth and trimmed the ends. And lastly I stained them.

Here's the photos:

Here's one of the finished racks. It's 50 inches long:


And this is a photo of the profile:


My back suddenly decided to really begin hurting so I didn't get a photo of the stain I used. It's a gel stain by General Finishes called Candlelight. It's really pretty.

Ok, tomorrow I'll apply the first of two coats of polyurethane and I'll also go and purchase some coat hooks.

I'm going to go and sit down.

See you tomorrow,
VW

Monday, May 27, 2024

Hello, I'm back with a new project

 Hello All,
Well, it's been a very long time since I've made anything or done any posts. I needed some down time to re-think my craft endeavors and to think and explore other ways of making furniture, bowls, and other things. I've also explored other media such as clay and painting which I'm going to be working on later this summer. It's been a fruitful time and I hope this time off is reflected in my work.

So I have a simple project to begin with: a coat hook rack for clothing, bags, hats, or anything that can be hung on a wall. 

Discussion & Plans

A few years back I made a simple coat rack out of pine and some fancy coat hooks that I applied to one of our bedroom walls. It's held scarves, bags,  hats, umbrellas, all kinds of stuff, in an organized manner. And it looked good too. My daughter-in-law used it for a while to hang belongings on and at present it's in the closed in the master bedroom. 

Here's a photo:


As you can see it's a simple project made out of common pine and coat hooks. This one is about 52 inches long, 5 inches wide and has a narrow shelf on the top that is about 2 1/2 inches wide, and we place lent rollers on it. And it's screwed into the wall studs with self tapping screws. 

My daughter in law needs two of these so I purchased some 1"x8"x8' long common pine boards and proceeded to rip them both down to about 6" wide. The long strips of waste wood became a narrow shelf on the top and a 1/2"x1/4" thick strip hides the joint underneath and gives the rack a little bit of visual interest. I also sanded the wood smooth with 150 grit sandpaper:


I glued the top piece down and glued and glued and nailed the narrow piece: 


I will be trimming the ends down when the glue is dry:


And here is the rack right now. Later this evening I'll take this out of the clamps and construct the second rack and let the glue dry over night: 


When I'm done building them, I'll stain them coat them with polyurethane and attach 6 hooks per board.

Stay tuned.
VW