I'm back.
I was working on the pet urn for a friend of mine and today I finished turning it, constructing the lid, sanding it smooth, and applying a preliminary finish. Here are the photos:
This is a photograph of the test lid and a new set of threads from a small pvc fitting. The fitting will fit into the underside of a new lid that I'm about to construct:
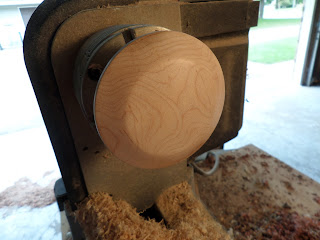
The threads have to be securely epoxied into the underside of the lid so I will need to re-make the lid out of a thicker piece of wood. I have a small piece of maple that I'll use for this:
This is the blank on the lathe ready to turn:
The blank is thick and blocky looking from the side and it needs to be thinned quite a bit. One way of thinning it down but preserving the center of the wood is to create a series of bevels on the top of the lid, on the side of the lid and underneath the lid. This will enable me to create a lid that appears thinner than it really is:
This is the lid just sitting on the top of the urn. You can see the bevels clearly here:
I'm really pleased with the way this looks and so the turning for this project is complete:
Finishing the Urn
I sanded the lid to 400 grit and applied a thin layer of polyurethane to it. It looks and feels almost like plastic. I'm very pleased with the way this came out:
And here is the body of the urn re-mounted on the lathe for sanding. This also was sanded to 400 grit:
And given a preliminary coat of polyurethane as well:
This is the urn at present:
And this is what it will look like when finished:
Both the lid and the body will need several more coats of polyurethane interspersed with hand buffing. When the finish is done I'll epoxy the threads into the lid and separate the urn from the waste wood on the bottom and then it will be completely finished and ready for shipping.
I'll post finished photos probably this weekend.
See you soon,
VW


No comments:
Post a Comment