Saturday, March 30, 2013

Tea boxes-Discussion and Plans

Hi Everyone,

Well, the temperature has gone up and it rained nearly all night last night and so this means that the snow and ice are on their way out! Yay!  Flowers and lots of green stuff are just around the corner.

While we're waiting for the trees to leaf out, let's make a tea box.

Discussion

Tea boxes are not terribly difficult to make if you use kiln dried wood for both the lid and the box. Green wood is more problematic as it can distort some while it dries. This can leave you with a lid that doesn't fit or a box that wobbles on a flat surface. Very slow and careful drying is required for that. We are going to be using both kinds of wood for the tea boxes I have planned.

Here is a photo of the blocks I have in stock at the moment:


The block on the left is laminated, kiln dried pine. The block on the left is a solid block of silky oak that is coated in wax. The pine block is 6" square and about 5 1/2" high. The silky oak block is 4"x4"x7".

These two blocks are both 6"x6"x3" and they are a mix of various colored hardwoods. These are dried wood as well and they can go on the lathe for turning at anytime:


All of these will make nice boxes. The silky oak is green, unseasoned wood. It's sealed in wax to prevent it's drying out prematurely before we have a chance to slowly dry it out ourselves.  The pine block is dry and so that can go on the lathe right now and be turned and we won't have to worry about it cracking or distorting as we move through the production process.

Plans

The first thing I'm going to do is take the silky oak block and turn it into a cylinder and take off all the wax and then wrap it in several layers of heavy paper for several months. Doing this will allow it to dry slowly and hopefully not crack. While it's drying out we'll use the pine block and the other laminated kiln-dried blocks to make several tea boxes. We'll go through the whole process step by step together and when we're done we'll have a useful and lovely gift for someone.

So grab some coffee and stop by the wood shop-we have another adventure ahead!

Have a good weekend,
VW

Friday, March 29, 2013

Scrap wood ideas-small square box with a turned lid

Good Evening Everyone,

Well, I was very busy all day today and I decided since I had been a good girl, the wood fairies should reward me with an hour in the work shop.

I generate a lot of small scrap like most wood workers do and I'm really ruthless about getting rid of them and keeping the shop uncluttered. But it does pay to keep small blocks of wood-they make knobs and other small things that you don't want to cut up a larger piece of lumber for.

I bought a large glued up pine block a while back and I cut it into smaller blocks (you'll see one of them tomorrow when I write about the tea box).  I bought some small earrings recently and I needed a small box to keep them in and so I took two of the smaller pine blocks and put them to work.

Here we go:

I decided to make a small square box for my earrings. It's a fast short term project that is easy to make:


I took the larger of the two blocks and sanded the sides smooth and then I drilled a 2 1/4" diameter hole into the center of it with a Forstner bit and that finished the box portion. Then I took the other block and drilled a 1"diameter hole into it and used the hole to put it on the lathe. I cut a small tenon on it that is the same diameter as the hole in the block so the two fit together:

Then I shaped the outside of the top to smooth it and to create a small knob. Total turning time was about 30 minutes from beginning to end:


The box needs to be sanded very smoothed and then finished. This is a neat project if you need to make a small gift for someone or if you want to use it as a gift box to give to someone with a present inside.

Another amazing adventure at SWW Blog!

See you tomorrow,

VW

The Art of the Cutler

Hi Everyone,

Ever wonder how scissors are made?

In the UK, in Sheffield, they've kept the craft and art of scissor making or cutlery, alive. At Ernest Wright and Sons, they still make fine crafted scissors by hand and they make them to last 100 years.  Compare that to mass produced scissors that are not going to last anywhere near that long. Here is a really cool video that was shot at their factory:

http://www.bbc.co.uk/programmes/p010766w

They are making a real effort to keep craft alive and we should be doing the same thing here.

Best,

VW

Thursday, March 28, 2013

Three Sisters Project-Done!


Hi Everyone,

Well the Three Sisters Project is finished and here are the final project photos:

The Walnut Plate

The White Ash Plate

And the Cumaru Plate

I'm going to pack these up and mail them off tomorrow. I hope the Three Sisters enjoy them and find some meaning in them.

___________________________


Ok. I have to clean up the shop and get ready for the tea box project so I'll be doing another posting about that in a day or so.  As it's Easter Weekend here in the US, I won't do any wood turning until next week.

Have a great weekend-see you soon,

VW

The Mighty Bowl

Hi Everyone,

Well, the bowl is finally getting it's just due. The Museum of Contemporary Craft in Portland, Oregon, USA, currently is featuring an exhibit about bowls. You can see this online at:

http://mocc.pnca.edu/exhibitions/5412/


And the New York Times has an article about bowls at:

http://www.nytimes.com/2013/03/28/garden/finally-the-bowl-gets-its-due.html?pagewanted=all&_r=0


Horaay for the Bowl!


VW

Tuesday, March 26, 2013

Equality


Equality-now that's a very good thing!

Three Sisters Project and the next project

Hi Everyone,

The Three Sisters project plates are almost done and they came out very well. Here is a group photo:


These will be done this weekend and then mailed out.

____________

Time to start thinking about our next project and I'd like to make a tea box. Tea boxes are a special item that I've made to thank friends and family who have been kind and supportive of me during the recession and beyond. I never sell them and they hold a lot of meaning for me and for the person who receives one. There are several people who deserve one and I'm going to begin making them and you can follow along.

A tea box consists of a round box about 5 1/2" in diameter x 3" high with a lid that has a small knob on top. I have made a number of them now and I'm thinking of changing the design a little. I'm a big fan of Japanese woodturner Yasushi Kawaguchi's YouTube videos. He only has two videos but they are very well done and very instructive. He makes a small tea box in one of them and you can see his method here at: http://www.youtube.com/user/yasushikawaguchi.

The box in the video is quite small, much smaller than my tea boxes. I'd like to make a tea box using the same method he uses but with a larger turning block. I have several blocks in stock right now-a solid block of silky oak from Turning Blanks 4U, a solid pine block from Forrest Wood Products, and a couple of calico blocks from Green Valley Wood Products and I have a lot of hickory and several other woods in my own stock that I can laminate together.  I'm not sure which I'll use for this. Maybe I'll use them all.

Ok, I need to clean up the shop and I'll see you again this weekend.

Thanks for stopping by,
VW

Monday, March 25, 2013

The Three Sisters Project-Walnut Platter

Hi Everyone,

Well, I've worked hard all day and so I decided to reward myself with some shop time (it's better than eating junk food you must admit!). The walnut plate needed to have it's finish sanding done and that's what I did. Here are the photos:

Here we are at the beginning. I did some preliminary sanding on it yesterday but it still needs more sanding to get it where we need it to go:


This is the final sanding photograph. I've sanded it from 100 to 400 grit and then polished it with 0000 steel wool. This final step shaves off any fuzziness on the surface and also makes the surface very, very smooth:


Time to go upstairs and oil this baby and here are the results. The figure in the wood shows up very well. I've also put linseed oil on this as well:


Walnut and oil finishes seem meant for each other. When Mother Nature invented trees and wood she also probably came up with the idea of oil at the same time.

Ok, I'm going to re-oil the other two plates with a thin coat of oil tomorrow and the walnut plate will receive an additional coat of oil on Wednesday. I'll let them dry until this weekend and then it will be time to send them off.

More later,

VW

Sunday, March 24, 2013

The Three Sisters Project-Finish Sanding and Oiling

Hi Everyone,

I had a little spare time this afternoon and we all know that I can't resist working in the wood shop even its only for 5 minutes. So I decided to finish sanding the square and the ash plates.

Here we go:

Here is the finished ash plate. I've sanded it to 400 grit and polished the surface with 0000 steel wool. It's ready for oiling at this point:


I love oil finishes. They make wood look so beautiful and you can feel the wood with your hands when it's finished. There isn't a layer between you and the wooden object. I like to use Tried and True varnish oil. It's linseed oil with a dryer added to it. Linseed oil  finishes are an old time type of a finish but the bad part about them is that it can take several weeks to a month for the finish to dry and cure. The dryer in this cut that down to about 24-36 hours.

The trick to using this is to use this product at room temperature (since it's so cold here I keep it in my house. I don't think storing at really low temps is good for this), and to apply multiple thin coats of oil with at least 36 hours of drying time between coats of oil. This product is the consistency and color of honey so it doesn't take a lot to oil something.

The surface should be free of all wood dust and so should your hands. You should only rub in enough to barely wet the surface and then set it aside for about an hour. If after an hour there is any wet spots on the surface, you should take a clean cloth and gently rub that away and then let your item dry:


Ok, time to oil. This is always my favorite part of any project.

Drum Roll!!

Here is a photo of the ash plate with half of the surface oiled and the other half still un oiled:


 And here is a photo of the cumaru plate:


I'm going to let both just sit for an hour and then I'll take another look at them and if they need it, I'll rub down the surface to take away any excess oil.

The walnut plate has some tear out and that is going to have to be sanding completely away before I do the finish sanding and oiling. I will take pictures and post them in a day or two when that's done.

All of the plates will get two coats of oil and I'll post finish photos before I mail them off.

VW

Interlocking Wood Grain-What is it?

Hi Everyone,

I've received a question about interlocking wood grain-what exactly is that?

Normally the grain of a tree runs up and down the long axis of a tree. Interlocking grain is the result of a spiraling of the wood grain up the long axis of a tree. Periodically, every several years, the grain will switch back on its self and spiral in the opposite direction. This makes for a very strong tree but it's really hard to machine this type of wood as the surface tends to tear up rather easily.

Here is a link to a pdf article on the subject. It's a good discussion on the subject and also of basic tree anatomy:

http://www.treeworld.info/f29/spiral-interlocking-grain-trees-17891.html

Be sure and scroll down a little. You'll see a link to the article.

VW

Saturday, March 23, 2013

A Prayer

Hi Everyone,

I just want to share this poem with you all:


A Prayer

© Patricia D. English

Today I woke up
And said a prayer for you
I prayed that you'd forgive me
For all the stupid things I do

I prayed for a love to find you
A love so pure and true
A love that will never die
Like the love I feel for you

I said a prayer for the ones you love
And the ones that love you
I prayed that you'd see the sky
In all it's beautiful blue

A prayer in my mind
A prayer in the air
A prayer soaring up
without a care

I made up my mind to say a prayer
Each and every day
A prayer that you'd find happiness
in every single way.


Source: A Prayer For Love, Family Poem about Love http://www.familyfriendpoems.com/poem/a-prayer-for-love#ixzz2OQLZyZPP 


Good Night,

VW

The Three Sisters Project-Surface Prep

Hello Again Everyone,

Well, I did a whole mess of housework today and as a reward to myself I decided to do a little work in the workshop. I've done some preliminary sanding on the plates and here are the photos and comments about sanding.

First of all, I really hate sanding. It's boring and it makes a huge mess in the shop:


But it is very necessary and something that has to be done. I try to turn as smooth a surface as possible and most of the time I succeed. But some woods are hard to turn and in the case of the cumaru plate in the photo, the curvature of the surface and the interlocking grain make achieving a very smooth surface with a turning chisel rather difficult. So I got out my trusty hand drill and a 3" circular sanding disc and went to town on the plate:


The cumaru plate has special challenges-the interlocking grain and the corners. When the plate is spinning on the lathe I can't see the corners clearly. They look like shadows and with the curve on the inside of the plate extending all the way to the corners, it's difficult to know if the sanding paper is making contact with the wood. So I take a piece of chalk and color in the corners so when it's spinning I can see the surface:

I turned on the lathe and ran it up to 600 rpm and started sanding, first with a 100 grit wheel and then with a 180 grit wheel and that got most of the deep scratching off the surface, but not quite all of it. So I turned off the lathe and locked so it wouldn't move and sanding it while the plate was stationary. This got off the rest of the scratching and left a smooth surface.

Here is a photo of the plate. I've wiped it down with mineral spirits so you can see what it will look like when it's done:


The color in this is really rich and beautiful. Cumaru wood is always worth the effort.

The walnut plate bothered me quite a bit. I didn't like the inside rim that I turned on it the other day and so I decided to remove it:


My intent in turning the plate in this manner was to take advantage of the chocolaty character that walnut seems to have. Turned wooden items made from black walnut have a certain warm, undefinable quality to them that makes you want to pick them up and run your hands over the surface.  I was trying to emphasize that in this turning and I felt that interior rim detracted from that. So off it came. Here's a photo about 5 minutes later:


I think it looks better this way. And so I sanded it for a few minutes and then wiped it down with mineral spirits and this is what it looked like:


Lastly the white ash plate-this happy fellow doesn't require a lot of heavy sanding or re-shaping. I've sanding this up to 180 grit at this point and wiped it down also with mineral spirits and here is the color of this plate:


Now all of these plates are going to need more sanding up to 400 grit before we get down to oiling them. The walnut and ash plates can be completed on the lathe. The cumaru plate will have to be hand sanded to completion as doing that on the lathe could be dangerous.

I'll keep sanding away and post photos early next week.

Have a good weekend.

VW

Friday, March 22, 2013

Three Sisters Project, continued: The white ash and cumaru plates

Hi Everyone,

I'm going to continue today with some work on the white ash and cumaru wood plates.

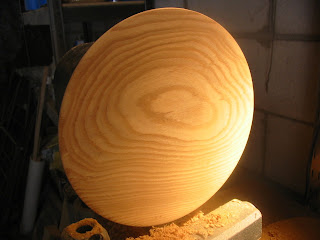
Here is the white ash plate as it's the easiest of the two turns:

The White Ash plate
I really enjoy turning white ash. It's got a lovely color that food looks great on, it's not as hard as some of our other domestic hardwoods here in the US, and it has a very bold grain pattern. It also turns very well. I'm often surprised that it isn't used by turners more than it is.

I found several pieces of it last week at my friends the cabinet makers at Forrest Wood Products in Oakdale and bought them both and I cut out a platter blank from one of the pieces:


Here is a photo of the blank on the lathe. I've penciled in the foot and also a tenon for the wood vice. I'm just going to make a very simple plate out of this as it has a lovely, busy grain pattern and I think this type of turn will emphasize that nicely. I'm going to set the camera down and turn the underside of the plate:


Here is the underside of the plate about 10 minutes later.  It's got a nice arc and I've smoothed with with my skew chisel. Time to flip it over and hollow out the top of the plate:


 Here is a photo of the finished plate. This type of a design can't have any surface imperfections. It must be smooth and have a nice arc and I think I've managed to get that in this plate:


 And here is a photo of the plate with some wood shavings on top in order to convey depth in the photograph. This will need a very smooth, fine sanding:


The Cumaru Wood plate
Cumaru wood is an imported hardwood from Brazil that is mostly used here in the US for flooring and decking. It is very very dense and it has an interlocking grain which makes machining it difficult to do. It tends to dull tools very rapidly and it is hard to work with. The upside of this wood is that it's really beautiful. It has a deep golden brown color and a beautiful grain pattern to it and I think it will make a neat plate.

I decided to make a square plate out of this particular piece. Square turnings are difficult to do as it's easy to accidently break off the corners while turning and like the white ash turn above, there can't be any surface defects left when done. A good even wall thickness is imperative too, to show off the arc of the turning. On top of this cumaru requires a fast turning speed and very sharp tools and a lot of patience to get a good result. Lastly, this is a very dangerous type of turning:


Here is a picture of the blank on the lathe. You can see the sharp corners. If one of those corners should hit my hand or arm while the blank is spinning, it could result in a very, very bad accident so set up with this type of turn is important and this certainly isn't a turning project for the inexperienced turner. (and here's my diclaimer: this is dangerous and so I'm not showing the process photos for this. Don't do this turn on your own.)


Here is a photo of the turn after about 15 minutes of turning. You can see how the surface is dished out. This hollowed area will have to be taken all the way to the edge of the blank without damaging the corners. This is more difficult than it sounds as I can't see the corners as they're spinning. All I can see is a shadow and so I have to very carefully sculpt away the wood at the edge. The total turn time for this was about 90 minutes. I did it very slowly.


Here are some photos of the finished plates from today's session. This is the cumaru wood plate. You can see how it appears "bent" and the corners are still there. The surface is really beat up and this is going to take quite a bit of sanding to fix:


This is the walnut plate. I've narrowed the rim somewhat and sanded it a little. I'm not sure if I'll eave the inner rim in place. I'll have to think more about this:


And here is the white ash plate with a small candle on it to convey depth. This also needs a lot more sanding:


All of the plates are going to need considerable sanding before finishing. I think all of these plates will look great with a coat of linseed oil on them so that's probably what I'll do. I'm going to do the sanding off line (not much to see there) and let you know when the plates are ready for oiling and we'll do that together so you can see the finished products.

I'm going to go and make dinner so I'll see you again next week. Thanks for dropping by the wood shop!

Best,
VW

Wednesday, March 20, 2013

Three Sisters Project-Walnut platter

Hi Everyone,

Well, it's the first day of spring and I feel like I'm frozen solid. I spent a little over an hour in the shop this afternoon and I was getting chill blains so I stopped, gathered up the camera and the platter and decided to stop for the day.

I decided to work on the walnut platter today and here are the photos from this session;

Here is the walnut blank. This is a nice, small clear piece of black walnut and it should work well for this project:


Here is the blank on the lathe, ready to turn. I've marked off the foot of the platter with a pencil. This platter will have a very shallow, narrow foot, just enough to elevate the platter off of whatever surface it sits on:


 Here you can see the foot taking shape. I've also removed wood from the bottom surface to the edge of the rim:


This is a profile photo of the blank. Compare it with the photo underneath. You can see how the bottom is angled towards the rim and how the rim is being shaped and turned in towards the center of the top of the blank:


 I had wanted to create an orange peel effect on the outside surface of the platter and to do this I used my wire wheel in my hand drill. Unfortunately it didn't work so I decided instead to smooth the surfaced down and get it ready for oiling a little later on:


Here is a photo of the platter thus far. I've hollowed it out some and created a rather wide rim, which I'm not too keen on at the moment. I may wind up narrowing that down some:


 Here is the underside of the platter:


 And this is a side shot of the rim:

This platter needs more turning. There's a slight bump in the center of the platter that needs to be removed and the rim needs to be narrowed about 1/8 ". I think narrowing the rim will look a little better.

As it's really cold out, I'm staying in for the rest of the first day of spring and getting warmed up. I may work on the platter tomorrow if I have some spare time.

More later,

VW

Tuesday, March 19, 2013

The Three Sisters Project-discussion and plans

Hi All,

Well, while Holly's bowl cools it's heels in the shop, we have another project to do and here is the story behind that:

I have a lovely cousin in California who is quite ill at the moment. Fortunately she has a lot of family support in this and specifically she has what sounds like three lovely daughters who have been actively supporting her and her husband. Two of the daughters live in California and the other lives on the east coast. All of them have quite a distance to travel but they do take the time to see their mom and to help out their dad.

I don't know about all of you but being a caregiver can be a lot of work and very stressful and the people in this world who do care for very ill family or friends should be called out and recognized for all that they do. So here is the SWW effort in that direction: I'm going to make the daughters each a small present as a thank you and also to let them know that regardless of how the situation with their mom turns out, they have family who care very much about them.

Discussion and Plans

I'm going to make each of the daughters a small wooden plate that they can take home and use. I have some white ash, black walnut, and a piece of cumaru wood to use in this and I've cut out two of the blanks so far.

This is a photo of the cumaru plate (the square plate) and the black walnut blank:


I will cut out the white ash blank later this week and get all of these blanks ready for turning. As I've only turned one piece of cumaru wood in my life, this will be a new adventure as this wood is very hard and dense and will present a challenge.

So here we go again. Get some coffee and drop by the wood shop-we have a new adventure before us.

Best,
VW

Sunday, March 17, 2013

Holly's Bowl-Can this bowl be saved, part 2

Hi Everyone,

Well, here's what's happened: I went out to the work shop last night and decided to take the bowl off the lathe and bring it indoors so I could study it a bit and over night it began cracking again. And not only did it crack, it has also distorted. Here are some photos:

This is a side view of the bowl. I decided last night to create a double rim on it and you can clearly see this in the photo:


The next three photos show extensive cracking, both inside of the bowl and on the outside:


This photo also shows some gouge marks on the side as well as cracking:


What to do: the bowl has several problems: cracking, distortion, and the surface needs a lot of smoothing. I think the thing to do at this point is to take it off the lathe and set it aside for a few weeks and see if the cracking and distortion lessen. The roughness on the surface will need quite a bit of sanding down but that's not difficult to accomplish. So down it goes into the wood pile for a brief vacation from turning:


Our next project is to make several fruit platters for several exceptional young women. I'll tell you their story and we'll discuss making the platters later this week.

Happy St. Patrick's Day and have a good rest of the weekend.

VW